Author: iamdavid

  • Understanding AWS IAM and Integrating with Okta and Workflows

    Understanding AWS IAM and Integrating with Okta and Workflows

    I’ve been looking into application entitlements and the Amazon Web Services (AWS) users, groups and entitlements has perplexed me for some time. I’ve had the opportunity to explore it, try to understand it and build some integration between Okta Workforce Identity Cloud (via Okta Workflows). This post is a summary of my findings.

    AWS and IAM

    To say the AWS entitlement model is complex is an understatement. Whilst AWS does have the standard users, groups and entitlements approach, the implementation is not straightforward. Some users/groups are defined within an AWS Account, some across accounts and some users have federated access but are not known to AWS. Similarly there are different entitlements, in the form of Roles, Policies and Permission Sets to grant access. There are also two IAM functions in AWS – IAM and IAM Identity Centre, where objects and management are very different. Lets look at the two.

    AWS Identity and Access Management (IAM)

    AWS IAM is the older mechanism for managing users and access. It resides within an account and controls access for functions in that account.

    It has three types of users: the root user, IAM Users and Federated Users. IAM users are defined locally, whereas federated users are not defined in IAM. There are local IAM groups for grouping IAM users (but not federated users). 

    It defines Policy to control access, using Permissions (defining the resources and actions possible against those resources). These policies can be associated with users (IAM users), groups (IAM groups) and roles. Federated users do not have a user object in IAM, they will assume a Role (e.g. passed in the SAML assertion).

    These objects and their relationships are shown in the following figure.

    We will explore the Okta integrations later, but there is no provisioning of Okta users (or pushing of Okta groups) to AWS IAM. IAM Users and IAM Groups are locally managed. Okta users assigned to the AWS application can SSO to AWS using an assumed Role (the Role lists is pulled from AWS into Okta).

    AWS IAM Identity Center

    The (newer) AWS IAM Identity Center operates across AWS Accounts, so you can manage users and their access from one central location for all your AWS Accounts. It also has Users and Groups. These can be managed directly in the AWS admin console, or programmatically via the SCIM APIs.

    The entitlement in IAM Identity Center is the Permission Set. This is mapped to one or more Policies in different AWS accounts (via an IAM role). You could have a permission set that covers permissions across different AWS accounts. The assignment is done via the account, i.e. in the UI you need to look at the account assigned to the permission set to see the users (and groups) assigned.

    These objects and their relationships are shown in the following figure.

    Again, we will explore the Okta integration points below, but the Okta Integration Network integration for Identity Center supports provisioning users and pushing groups to Identity Center.

    AWS IAM and Okta WIC

    The previous sections of this article have presented the two IAM functions available in AWS and the users, group and entitlement objects each has. We’ve also introduced some of the Okta integration points and patterns.

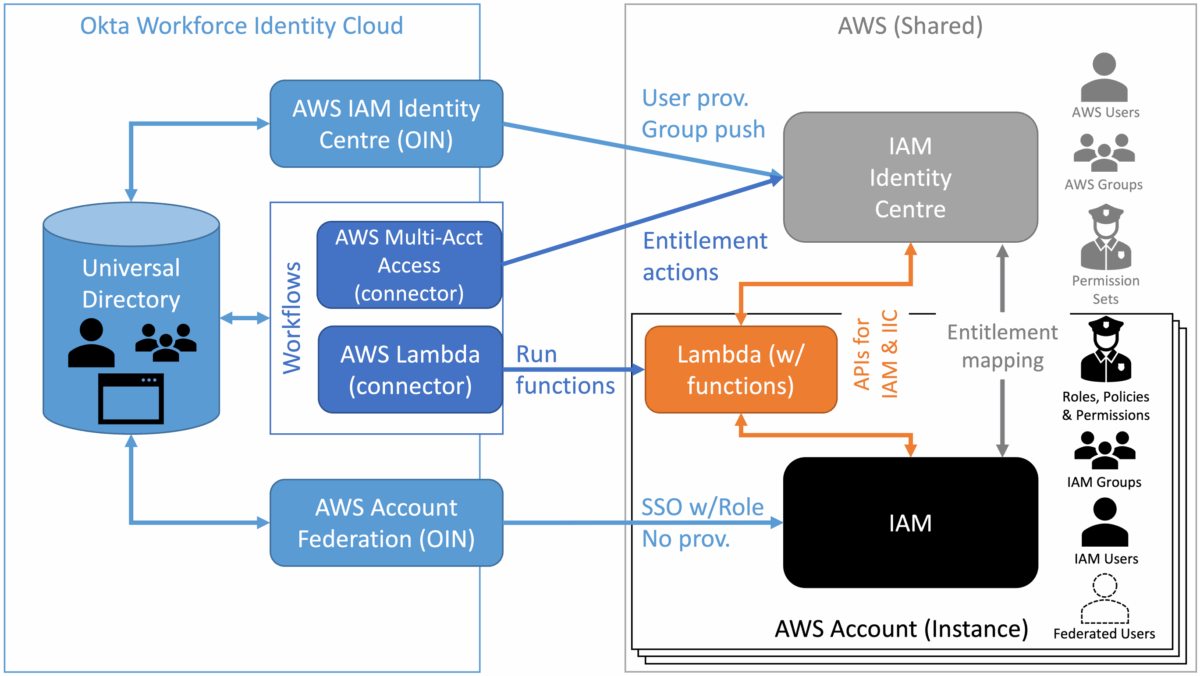
    The following figure provides a complete view.

    On the right of the diagram is AWS, with one or more AWS accounts. Across all the accounts is the shared IAM Identity Center, and within each account there is IAM. The diagram also shows the IAM objects for each. AWS Lambda is also shown as a means to run code in AWS, such as using APIs to interact with the different IAM functions.

    From Okta there are both OIN integrations and Workflows connectors.

    Okta OIN Integrations with AWS

    There are multiple OIN integrations for AWS, but two are important for IAM: AWS Account Federation and AWS IAM Identity Centre.

    The AWS Account Federation integration supports SSO (SAML and SWA). The OIN page says it supports provisioning (Create, Update), but the only function it really supports is importing the Role list for use in SSO – it cannot provision Okta users nor push Okta groups to AWS IAM. It’s main function is to support Okta users that are assigned to the app to SSO to AWS.

    The AWS IAM Identity Center integration supports both SSO (SAML) and provisioning/group push to AWS IAM Identity Center. Okta users and groups can be pushed to IAM Identity Center and mapped to permission sets to grant access to AWS functions in specific accounts. It also provides an Okta Workflows connector and template.

    Okta Workflows Integrations with AWS

    There are currently three connectors available for AWS: AWS S3 (not relevant here), AWS Multi-Acct Access (for IAM Identity Center) and AWS Lambda.

    The AWS Multi-Acct Access connector (listed as part of the AWS IAM Identity Center OIN integration) is a standard connector with Workflows and also ships with a template. It works with entitlements (permission sets) in IAM Identity Center and has five actions:

    • Add AWS Entitlements – add a permission set to a user/group
    • List AWS Entitlements – list permission sets assigned to a user/group
    • List Instances – list the instances (accounts) tied to the user the connector is authenticated as (i.e. what accounts this user can centrally manage).
    • Remove All AWS Entitlements – remove all permission sets from a user/group
    • Remove AWS Entitlements – remove a permission set from a user/group

    These actions will address most IAM Identity Center needs. Where they don’t, or there are challenges with using the actions, you need to revert to a programmatic approach to working with the IAM APIs.

    This is where the AWS Lambda connector is useful. You can create Lambda functions that invoke API calls to both IAM and IAM Identity Center. This has it’s own challenges and design considerations. We will look at an example implementation of this next.

    Using the AWS Lambda Connector for AWS IAM Management

    In this last section of the document I look at an example of managing AWS IAM objects (in this case Identity Center) via Lambda functions from Workflows.

    Requirements

    I was looking for a way to manage IAM objects in Identity Centre from objects and events in Okta. The key requirements were:

    1. I needed to be able to discover all the users, permission sets and user-permission set mappings in Identity Center,
    2. I needed to be able to provision/deprovision permission sets based on added/removed groups in Okta,
    3. I needed to be able to create user-permission set mappings when a user was added to a specific group in Okta, and
    4. I needed to be able to remove user-permission set mappings when a user was removed from a specific group in Okta.

    I am using Okta groups to represent the entitlements in Okta, and I have the AWS IAM Identity Center OIN implemented to provision/push Okta users and groups to AWS.

    Design

    Given these requirements I needed to use Okta Workflows for discovery and provisioning. The discovery flows could be manually run whereas the provisioning flows could be event driven from group change events in the Okta System Log.

    The AWS Multi-Acct Access connector addressed some of my requirements but not all, whereas there are APIs for everything I needed. I also hit some challenges with some of the AWS Multi-Acct Access cards and slow running processing in AWS. To simplify the flows and bypass these issues, I decided to build Lambda functions for all use cases and leverage the AWS Lambda connector exclusively.

    From a workflows design perspective I tried to focus on performance (over security). This involved storing data in Workflows tables, including security credentials passed to the Lambda functions. This is not ideal, but achieved the aim (you would look to a more secure approach in a production deployment).

    Implementation

    There were three things to be built for the implementation:

    1. A common IAM Role to allow the Lambda functions to run the APIs,
    2. Lambda functions for each of API calls I wanted to make, and
    3. The Workflows to implement the use cases

    I created a common IAM Role to allow the Lambda functions to make the IAM API calls.

    The policies tied to the role include some logging permissions and full access for IAM and Identity Center functions. You would trim this back to the minimum if deploying into production,

    Next I built a series of Lambda functions, one for each API call I wanted to make.

    Each of these were written in Python, leveraging the IAM Identity Center APIs (each API call has a link to language-specific pages, eg. Python). Note that the APIs refer to single signon, and the Python component is called sso-admin.

    The function had the same basic structure – pass in a JSON object, make the API call and return the results or error info to the caller. Here is an example:

    The key bit of code is as follows: run the boto3 client (for Python) with the passed API key id and secret, then try the API call.

        client = boto3.client("sso-admin",region_name="us-west-2",

        aws_access_key_id=os.environ.get(event['awsAccessKeyId']),

        aws_secret_access_key=os.environ.get(event['awsSecretAccessKey']))

        try:

            response = client.list_permission_sets(

                InstanceArn=event['awsInstanceArn'],

                NextToken=event['awsNextToken'],

                MaxResults=event['awsMaxResults'])

    All the values inside the event[] instructions are passed into the function via the payload object in the AWS Lambda connector Invoke card.

    Lastly I built the Workflows that leveraged the AWS Lambda connector, the Okta connector and some Workflows tables for data storage (environment variables, AWS permission sets and AWS users) to reduce the amount of lookup calls into Okta and AWS. As there were multiple layers of data in the discovery flows, I had to use some sub (or helper) flows.

    The provisioning flows (PROV*) were triggered by group change events through the System Log (e.g. group created/deleted, user added to/removed from group). I also used some shared, utility flows.

    The use of the AWS Lambda connector was straightforward and having the same IAM Role and same code structure in the functions made it simple to build them. The main challenge is making sure you’re passing the correct payload values in the object (and haven’t mistyped the label used in the function when creating the Object in the Construct card).

    One thing to be aware of is that the Lambda function will return a success code the the connector action even if the API call failed and was handled. In this case you need to code the workflow to interrogate the Output from the action to check for error responses.

    With these flows and Lambda functions, I was able to discover the users, permission sets and mappings in AWS, then create/delete permission sets based off Okta groups and add/remove users based off Okta group memberships.

    Conclusion

    Understanding the IAM mechanisms and objects in Amazon Web Services (AWS) is not as straightforward as it could be. This article has explored the different mechanisms, object and how Okta can interact with them.

    It has also shown a sample implementation leveraging Okta Workflows, the AWS Lambda connector, some Lambda functions and the IAM Identity Center APIs to discover and manage Identity Center objects from Okta.

    Hopefully this article will help clear the fog around AWS IAM and how Okta can work with it (them).

  • OIG Access Requests – Who is the Request Assignee?

    OIG Access Requests – Who is the Request Assignee?

    As is often the case, product documentation tells you how to turn on or configure a function but often doesn’t provide the context of that function. I found this yesterday when exploring something with a customer in Okta Identity Governance (OIG) Access Requests.

    What is the Request Assignee you can assign to some of the steps in an Access Request Type and how would you use it? This article will describe the Request Assignee and how it could be used.

    Most of the steps in a Request Type (request flow), such as questions, tasks, approvals and actions, can be assigned to someone. For a question, you may be defining who needs to provide the answer to a question (and it doesn’t have to be the requester). For an approval step, it is the person (or person in a group) who will review and approve/reject a request. For most of these, you can select the assignee, but for some actions, this is a fixed user (e.g. Okta actions are assigned to a user “Okta”).

    The options normally used are: Requester (person asking for access), Requester’s Manager, a member of an Access Requests Team (admin group in Access Requests), a specific user, or a member of an Okta group (i.e. Group pushed from Okta to Access Requests). The grouping options are discussed in Understanding User Grouping and Where Do I Assign Teams?.

    But what is this first option – Request assignee?

    To understand that we need to look at a Request Type and its ownership. When defining a Request Type (request flow) you specify the (Access Request) Team who will own the request – i.e. who can manage the flow definition and who can manage any request for that type.

    This is the team of people that will administer the requests, such as a helpdesk team or and IT ops team or a security admin team.

    When someone raises a request, Access Requests will select one person in that team to be the Assignee.

    The requester will also see the Assignee in the WebUI so they know who they can contact about their request.

    When would you use the Request Assignee in a request flow? When you want them to be prompted to, and interact with, a request (other than normal monitoring and management of requests). You may want the assignee to provide some commentary on the request through a Question, or you may want them to be an Approver in a multi-level approval flow.

    Hopefully this has cleared up what a Request Assignee is when Assigned to a step in a flow.

  • OIG Access Requests – Can an Approver Supply Information for a Request?

    OIG Access Requests – Can an Approver Supply Information for a Request?

    Recently someone asked if Okta Identity Governance (OIG) Access Requests could be setup so a manager could supply additional information for the request. Their use case, the requester wants access to an application but they don’t know the role they need, so the manager would select the role at the approval stage. Short answer – Yes!

    Request Types (or access request flows) normally comprise a series of questions to setup the request followed by approval and action steps to perform the change. The default is to assign the questions to the requester, but you can assign them to their manager or anyone else know to OIG Access Requests.

    Let’s look at an example – an employee needs wiki access, but their manager (who is the approver) will need to select the role and put in a comment relating to that role selection.

    For this I created four groups in Okta to represent roles (they would be assigned to the”wiki” app with the relevant role): Wiki-Consumer, Wiki-Reviewer, Wiki-Editor and Wiki-Admin.

    I then created a sublist in OIG Access Requests for these four group roles. This sublist was used as a Dropdown question in a new Request Type and assigned to the Requester’s manager. I also added a required Text field for Manager Notes, also assigned to the Requester’s manager.

    Note the icon to the right of the Questions? The single person in a circle icon is the requester, the org chart icon is requester’s manager (you can see it for the Manager Approval step also).

    When a user requests access, they are prompted to answer their question (“Request Justification”) and then Submit new request.

    The request is submitted and proceeds to the outstanding questions.

    The manager would see that they need to answer some questions also (highlighted by the numbered circle beside the Questions tab in the right pane).

    The view shows the question(s) already answered and the outstanding questions – one is the list of roles that can be selected and the other is the notes for a manager to enter.

    They select/enter the answers and Update.

    Once the answers are submitted, the manager then approves the request and the access is provisioned.

    As always you see the answers to the questions in the transcript of the request, but in this case we see the first was answered by the requester, and the other two by their manager.

    The Slack experience is slightly different for the manager with an additional section highlighting Your questions in addition to Your tasks. The message sent to Slack highlights the questions to be answered.

    But as it’s running the same Request Type, the flow and questions are the same.

    Thus, using a standard out-of-the-box feature in OIG Access Requests, you can setup an Access Request flow to get an approver (or someone else) to supply additional information to a flow.

  • Did You Know the Machine Learning in OIG Access Requests Extends to the WebUI?

    Did You Know the Machine Learning in OIG Access Requests Extends to the WebUI?

    If you’ve seen a demonstration of Okta Identity Governance (OIG) Access Requests, you have probably seen the machine learning (AI) capability when requesting access in Slack or Microsoft Teams. You ask for access to something, and the AI will try to determine the best request type to present. It learns over time, so that terms the business uses are readily translated to terms that IT uses.

    Did you know that capability is also available in the Web user interface for OIG Access Requests? No? Read on.

    If leveraging the OIG Access Requests WebUI, you are presented with a tiled view of request types (accesses you can request) on the App Catalog page.

    At the top of the App Catalog page is a search box that will leverage the AI capabilities in the same way the the Slack/Microsoft Teams do (in-fact all three interfaces are using the same capability provided by Access Requests, its not something baked into each interface). Note that the search box under the App Catalog heading will just search through titles, not use the AI engine.

    Typing something like “I need access to <blah>” will trigger the AI. It will evaluate whatever you type into the field, so you could type in just the name of the access you think you want.

    In the example above it has presented the “Carpark Access (Until a Date)” request as it’s the one I use most often when demonstrating OIG. But I also have the pull-down list of all request types available to me.

    Typing a string into the Search requestTypes field above the list will reduce the list to those matching what I type.

    In this case typing “Carpark” will reduce the list to those with “Carpark” in the title. If you have used the Slack/Microsoft Teams integration you will see it’s the same user experience.

    This mechanism makes it a lot easier to find a request when you have many requests exposed in the WebUI, particularly if a naming standard has been applied to request types.

  • New Reviewer Options in OIG Access Certification

    New Reviewer Options in OIG Access Certification

    There was a recent change to the reviewer selections for Okta Identity Governance (OIG) Access Certification to allow for more options and to simplify the administrative experience. The feature is currently an Early Access feature (the “Reviewer Assignment” enhancement) that can be turned on in an OIG-enabled Okta org. It will roll into production over time and may have done so by the time you read this.

    Let’s start by looking at a summary of changes.

    Summary of Changes

    Up until recently in Okta Identity Governance (OIG) Access Certification, there have been two types of reviewers – a single static reviewer, or a dynamic reviewer based on evaluating Okta Expression Language to derive a single reviewer at campaign launch time. A common scenario was to use the expression user.profile.managerId to determine the reviewee’s manager from their Okta profile.

    The types of reviewers has been expanded. An applications review screen now has the following options:

    There are two new options – User’s manager and Group. The first removes the need to enter Okta Expression Language to derive the user’s manager. This was a usability change (you could still enter the expression for the manager). The remaining options are the same as using the expression.

    The second will use a group defined in Okta, where the group members are the reviewers. This latter option opens up the ability to have multiple reviewers, solving the problem of a reviewer going on leave and having to manually reassign their reviews. We will give an example of this in the next section of the article.

    If the campaign is for groups, there is an additional reviewer option:

    This is leveraging the new Group Owner Early Access feature added to Okta Universal Directory recently (https://help.okta.com/en-us/Content/Topics/identity-governance/group-owner.htm). The feature supports assigning users and/or groups as owners of a group in Okta. The group owners can be reviewers in access certification campaigns. We will give an example of this in the last section of this article.

    A Group of Reviewers

    The ability to assign a group of reviewers addresses the issue of a single reviewer being unavailable. It opens up additional use cases, like having a team for reviewing access to specific apps or groups. This section is a walkthrough of what the new feature looks like.

    First, let’s create an Okta group for application review.

    When building the campaign we select Group as the reviewer type and select the group.

    As a side note, the UI has been enhanced to show additional information about the group being assigned (description, members and applications).

    When the campaign is created and launched, you will see it is assigned to the group, not individuals.

    The campaign administrator can reassign the campaign.

    If we look at the reviewer view, it is basically the same as campaign review pages in the past.

    They can see all the users and their resources, and can approve or revoke. However they cannot reassign as the campaign is assigned to multiple people in the one group.

    Group Owner Reviews

    The other significant option is to allow Group Owners to be the reviewers for group membership. This is similar to having Role Owners in other IGA products – someone who is responsible for that role and its membership.

    Let’s start with assigning some users to a group as owners.

    Then when creating the campaign we select Group Owner as the reviewer type. You need to specify a Fallback Reviewer incase one or more of the groups being reviewed don’t have owners assigned.

    When you preview the owner, you will see a message about a limit on the number of owner reviewers.

    As a best practice, you should consider the number of owners for your groups – a large number of owners may mean you have a loose governance model over your groups.

    When the campaign is created and launched, you see the group owner selection.

    The reviewers will see basically the same review screen as before.

    As before, a campaign admin can reassign a review item, but the individual reviewer cannot as it has potentially been assigned to multiple reviewers.

    Conclusion

    This enhancement represents more progressive and continuous improvements to the product. The new reviewer options are:

    • User’s manager – removing the need to use Okta Expression Language to derive the user’s manager as reviewer,
    • Group – specify a group of users to review, where they all get the notice but only one needs to review, and
    • Group Owner – leveraging the Group Owner feature on groups in Okta as reviewers, again supporting multiple reviewers

    The enhancement is addressing both the administrator experience (reducing the need for expression language in many cases) and improving the flexibility with multiple reviewers.

  • Okta Identity Governance and/or Service Now – Architectural Patterns

    Okta Identity Governance and/or Service Now – Architectural Patterns

    Most organisations have some ITSM or service request tool, and ServiceNow is the most common. So it’s understandable that any conversation about Okta Identity Governance, particularly access requests, will involve comparison with ServiceNow or integration patterns for both products. How do you approach an access request solution? Which product is going to meet your needs the best? What are the implications of one over the other, or do you need to think about an integrated approach?

    This article looks at the different architectural patterns available for Okta Identity Governance, for ServiceNow and for both working together.

    Introduction

    Identity management, or what is the “A” in IGA, has been around for a quarter of a century. Over that time the “Holy Grail” has been 100% role-based entitlement, tied some source of truth (like HR) with end-to-end lifecycle automation. But that isn’t practical for most organisations, so there has always been a need for a mix of role-based and request-based entitlement.

    Access request mechanisms have been a key feature of identity management (or IGA) systems. Any access request mechanism will have a standard set of capabilities:

    • A request interface – somewhere users can go to request access. This has traditionally been a web page (from an identity management tool or ITSM tool). But more recently we’ve seen the move to using chat interfaces like Slack and Microsoft Teams.
    • An access catalog – similar to having a service catalog in an ITSM tool, an access (or app) catalog represents the (app) accesses a user can request.
    • An access control mechanism – so you can control who can see/request what accesses.
    • An approval flow mechanism – a means to build workflows associated with access requests, so someone (such as a manager or application owner) must review and approve an access request. This needs to be flexible as there are often requirements for different types of approval flows for different access requests.
    • An audit trail – to prove to the auditor that there was a process followed for granting access via the request mechanism.
    • A means to implement the requested change – whether it’s connectors/adapters, APIs or talking to some system that will do it for you

    With the emergence of ITSM products, like ServiceNow, it’s become common to include access requests with service requests.

    So, which product should you choose to address your access request needs? Or do you need to think about an integrated approach?

    This article is looking at Okta Identity Governance (OIG) and ServiceNow, comparing the Access Request capabilities of each and how they can be integrated.

    Architectural Patterns

    There are five basic patterns we can consider as per the following figure.

    The patterns are:

    • A. OIG Access Requests provides the entire access request flow and updates Okta with access changes (no integration with ServiceNow),
    • B. ServiceNow provides the entire access request flow and updates Okta with access changes (no integration with OIG),
    • C. OIG Access Requests logs a ticket directly in ServiceNow as part of the access request flow (which could be used to drive further activity)
    • D. Okta Workflows creates a request in ServiceNow (possibly triggered by an Access Request from OIG)
    • E. ServiceNow triggers an access request flow in OIG Access Requests via APIs or by using Workflows to listen for new tickets in ServiceNow and then use APIs to raise requests in OIG

    We will explore each in the following sections.

    Pattern A – OIG Access Request Only

    This pattern involves only OIG Access Requests and Okta. Users, groups and applications are sync’d from Okta into Access Requests. They are used to build request types that are exposed through the various user interfaces as the request catalog. Users, based on role, can request access, have it reviewed and approved, and access changes are applied into Okta.

    We won’t explore OIG Access Requests in detail here. It does address the key access request capabilities listed above, but there are some features to highlight (which will become relevant in the comparisons):

    • It provides an easy-to-use interface for developing request types (approval flows) that doesn’t require any coding
    • It provides three different channels for access requests, a WebUI, Slack and Microsoft Teams, and the data collection form is based on the flow, not baked into each channel.
    • Users and user grouping for request visibility and approvals, is based off Okta users and groups
    • Auditing is via the common Okta System Log
    • Okta Workflows can be used to extend access request use cases
    • The functionality and integrations are included in the Okta Identity Governance licensing

    We have a number of articles covering OIG Access Requests features and use cases here. See Okta Identity Governance. You can also refer to the product documentation at https://help.okta.com/oie/en-us/Content/Topics/identity-governance/access-requests/ar-overview.htm.

    Pattern B – ServiceNow Only

    ServiceNow is a platform that supports integration with many products for many different service management use cases, not just access requests. It has an integration framework that is leveraged for Okta integration (note that we are talking about integration with Okta Workforce Identity Cloud, or WIC, not OIG Access Requests).

    The component labeled ‘SNow Okta “module”‘ could be one or more integrations available on the ServiceNow store (https://store.servicenow.com). These modules provide varying levels of integration into the Okta platform. Whilst there are currently (Dec 22) eight Okta integrations in the store, there are only three that directly relate to access request integration into Okta:

    • Okta Identity Cloud API Access is free and provides basic access to Okta orgs and APIs. It is a prerequisite application offering Connection and Data abstraction for additional Okta Identity Cloud applications. It consists of script libraries to allow ServiceNow applications to communicate with Okta at the API level.

    • Okta Orchestration Activity Pack is free but requires a ServiceNow Orchestration license (paid) and Okta Identity Cloud API Access (free). It exposes a toolkit of pre-configured Activities that place the power of the Okta platform at the disposal of a ServiceNow architect. It is used to extend the platform for onboarding, role management, self-service request and approval, etc. to Okta’s application and identity layer. It can perform user management and group membership management, but not application assignment.

    • Okta Spoke is a licensed component (“Use of this product requires a license for either Integration Hub Professional or Software Asset Management”). It provides actions to easily automate Okta user, password, group, group membership, application, application access, and logs management. It covers the user and group management functions but not all of the application assignment functions (e.g. no assign user to app). There is an Access Management Automation module that builds on top of Okta Spoke to automate many of the request actions.

    These integrations represent a spectrum of cost and functionality. The first integration is free but would require a lot of work to implement access request approval flows integrated with Okta. The other two integrations provide a higher level of functionality, meaning a lot less effort (and skills) to build approval flows, but come with licensing costs. They also only work at the user and group level – if you wanted to include application assignment, you would need to build this.

    ServiceNow provides its web user interface for requesting access. There is certainly a benefit in using the one interface for all service requests, keeping it simple for business users. ServiceNow does have integrations with Slack and Microsoft Teams. However the Slack integration requires building Slack workflows to present forms and the Microsoft Teams interface will strip data out of the chat and doesn’t use forms at all. Both could be used, but would require significant development effort to emulate the data entry forms used in the web user interface.

    ServiceNow has its own logging mechanism. Also, any activity against Okta (like adding a user to a group) would be logged in the Okta system log. If you wanted a consolidated audit trail, you would need to plumb the different log stores into a SIEM.

    Pattern C – OIG Access Request Calling ServiceNow Directly

    This is the first of the integrated patterns, where a ServiceNow ticket is created directly from an OIG Access Request flow.

    It uses the standard integration built into OIG Access Requests. More details on the integration can be found here: Integrating ServiceNow with OIG Access Requests.

    This integration is useful when you want to raise the request, have it approved and provisioned into Okta in OIG Access Requests, but need to log the request history in ServiceNow. The pattern could be used to trigger a flow in ServiceNow for other activity, but there is no feedback loop back into OIG to wait for completion. This is often used when ServiceNow is considered the record of all service requests and reporting is performed there.

    Pattern D – Okta Workflows Calling ServiceNow

    The second integrated pattern involves using Okta Workflows to log a request in ServiceNow.

    It is using the standard ServiceNow connector in Okta Workflows to create a request (or incident) in ServiceNow. It could be triggered off any change in Okta, including a request run through OIG Access Requests. An example of this integration can be found here: Logging a ServiceNow Request via Workflows from OIG Access Requests.

    This pattern is very useful when you want to use ServiceNow to drive provisioning to external systems not managed by Okta. OIG Access Requests would be used to raise and approve the request, then handoff to Okta Workflows (via a new System Log event with a rich set of information about the request) which raises the request in ServiceNow. Okta Workflows could also listen for updates to the ticket and update Okta as needed.

    Pattern E – ServiceNow Calling OIG Access Requests

    The final integration pattern is for ServiceNow initiating a request in OIG Access Requests.

    There are two approaches that could be used:

    1. Within SerivceNow the Okta Identity Cloud API Access module is leveraged to make an API call into OIG access requests to raise a request. Note this is theoretical and I’m not aware of it having been implemented.
    2. An Okta Workflow uses the ServiceNow connector to listen for a new ticket being created, then uses the OIG API to raise a request in OIG Access Requests.

    Both could achieve the aim of raising a request in OIG Access Requests in response to a ticket in ServiceNow, however the Workflows approach would be much simpler to implement.

    This approach is common when organisations want to use ServiceNow as the master service catalog but don’t have the means for direct integration with Okta.

    Considerations for Which Pattern to Use

    Now that we have explored the different patterns with OIG Access Requests and/or ServiceNow we can look at the considerations when deciding which pattern to use.

    OIG or ServiceNow

    If you don’t have ServiceNow, then you could compare the effort to implement either solution to address the key areas (UI, catalog, access control, flows, and audit). In most cases OIG Access Requests will be a lot easier and cheaper to setup and use. To achieve the same level of functionality in ServiceNow would require additional modules and development/configuration effort.

    But what about if you already have ServiceNow in use? It certainly makes sense to stick with the one user experience for your business users rather than throwing another user interface at them. How much work would be required to achieve access requests into Okta? This will depend on which of the ServiceNow Okta integration modules are used and how much development/integration effort is required. If no ServiceNow Okta modules are used, there is a variety of options that all involve cost (licensing and/or development effort). It may be that implementing OIG Access Request with ServiceNow is significantly cheaper than beefing up ServiceNow to talk to Okta.

    What about the user interface? As mentioned, having the one experience is optimal for business users. But businesses are moving to chat tools like Slack and Microsoft Teams, and having access requests integrated with these tools makes life easier for business users (and makes a more efficient access request mechanism as you don’t have the asynchronous delays of email-based request systems). OIG provides Slack/Microsoft Teams integration with no extra development effort, whereas to use either with ServiceNow will require some development (potentially needing specialist skills).

    Finally you need to think about the security of the system – how do you control access to requests, control who can approve requests and where the audit log goes? With OIG this is all centralised within the Okta platform – the same grouping applied to SaaS SSO access or MFA policies can be applied to access requests. The access request audit trail is centralised in the Okta System Log. If you run access requests through ServiceNow you may need manage access policy and audit trails in multiple products making auditing more complex.

    OIG with ServiceNow

    You may need to look at an integrated solution, rather than one product or the other. You need to consider: where do you need to initiate an access request, where do you need to approve it and where do you need to fulfil it.

    You may decide you need a chat interface or a simple way to build and present request flows, so initiating in OIG Access Requests makes sense. If you need to update access in Okta but log the request history in ServiceNow, then using the direct OIG Access Request ServiceNow integration (pattern C) is appropriate. But if you need to fulfil via ServiceNow (perhaps for provisioning to systems outside of Okta) then leveraging the new System Log events and Okta Workflows with the ServiceNow connector is more appropriate (pattern D).

    You may need to initiate all requests in ServiceNow as it represents the master service catalog and the user experience all business users are familiar with, but don’t want to implement the direct Okta integration described in pattern B. In this case you could raise an access request in OIG Access Requests, either directly or via Okta Workflows, and then perform approval and fulfilment there. The Okta Workflows approach is simpler to implement and would be recommended.

    Conclusion

    This article has explored Access Requests with Okta Identity Governance (OIG) and ServiceNow and the integrated patterns between them.

    As with any business problem, you should look at the current state and business drivers for change and decide on a solution based on that. It may be that you could choose to only use OIG or ServiceNow for an access requests implementation with Okta. In most cases, it will be easier to implement access requests using OIG, but this will depend on your environment.

    If you do need to look at an integrated solution involving both OIG and Service now, there are different patterns to support different use cases. You should explore your requirements and weigh up the different patterns to see what works best.

  • Risk-Based Application Certification in OIG

    If you were at Oktane22, or have listened to the Oktane22 roadmap sessions, you will know risk and use of risk signals is a key focus for Okta going forward. This includes leveraging risk in Okta Identity Governance (OIG), to help make access requests and access certification more effective.

    But can you leverage risk today? Yes. A common ask is for risk-based certification campaigns. We don’t have the ability to add some risk indicator to an application object in Universal Directory and leverage that in OIG Access Certification. However we can make use of Okta Workflows and the OIG API (currently in beta) to achieve the same thing. This article explores how this could be implemented.

    Overview

    The desired outcome for this sample implementation is to run a certification campaign for all user assignments to all “high” risk applications, such as shown below.

    The solution uses an application list stored in an Okta Workflows table that has all Okta apps listed and a risk rating (in this case “High”, “Med” or “Low”) assigned. You could use any approach to risk ratings.

    Then a Workflow runs through to extract all the “High” risk applications, build the components (body and header) for an OIG API call to create the campaign, then do the same to launch the campaign.

    As you will see below this was a fairly straightforward implementation. As I already had a set of workflows to create a campaign, this only took about an hour to build and test. When we get to the point of having the OIG APIs baked into the Okta Connector in Workflows, this will be even simpler.

    Components

    The solution was implemented using Okta Workflows – two tables and a set of workflows.

    The tables are: Environment Variables to store the apiToken and other variables used in the flows, and Applications to store the application list.

    There are three sets of flows:

    • M1* – Flows to populate the Applications table
    • M5* – Flows to create and launch the campaign
    • U0* – Shared utility flows

    The next sections describe the components and use.

    Building and Storing Application Risk

    The first step is to populate a workflows table with all the applications defined to Okta. The M1* flows do this. Once the list is populated, an administrator would go through and assign a risk level to each application.

    Each time you run the M10 flow, it wipes the application table. If you were implementing this in a production system, you would probably make it more of an add/update mechanism so you don’t lose existing risk assignments.

    For the second step (below), we only need the risk rating and resourceId (Okta application Id) – the other fields are just for the info of the admin setting the risk rating.

    Creating and Launching a Risk-Based Campaign

    The second set of flows will use the applications table to pull all “high” risk applications and use them to create and launch a campaign.

    The main flow (M50) will setup some common variables (Okta domain for API URL construction, and the authorization object) then:

    1. Run a subflow (M51) to extract all application table rows where “Risk Rating” = “High” and return a list with a single object of resourceId (the Okta application id). Not coincidentally, the “resourceId” label is used in the OIG API call, so there is no reformatting of the object required.
    2. Run a subflow (M52) to build all the parts of the API call to create a campaign, put them together in a body object then make the API call to create the campaign.
    3. With the returned campaignLaunchURL, build and run an API call to launch the same campaign (M53).

    I won’t go into depth with the actual workflow steps. A very similar set of flows is explored in OIG – Certification for External System Entitlements.

    The end result is a campaign with all the users assigned to the high risk applications.

    Of course the flows could be modified to have different settings on the campaign.

    That’s it, pretty simple and easy to implement.

    Conclusion

    This article has shown a sample implementation of how a risk-based application access certification campaign could be implemented using Okta Identity Governance, Okta Workflows and the OIG API. It is a fairly simple implementation that is easy to build.

  • Logging a ServiceNow Request via Workflows from OIG Access Requests

    A common ask for Okta Identity Governance is to be able to log at ticket in a service desk tool, like ServiceNow, for manual provisioning activities after following an approval process in Access Requests. This article explores one approach to this using OIG Access Request events in the Okta System Log, Event Hooks and Okta Workflows.

    Overview

    This solution is an example of how Okta Workflows can be used to log a request in ServiceNow. Whilst there are other examples of this around, this one is specifically tied to Okta Identity Governance (OIG) Access Requests.

    It is a one-way flow from OIG Access Requests, through Okta to Okta Workflows and ServiceNow as shown below.

    The steps are:

    1. A user requests access to a resource (like an app) in OIG Access Requests,
    2. The completion of the flow for this access request writes an new event into the Okta System Log,
    3. An Event Hook in Okta will trigger on this event and call an Okta Workflow,
    4. The Workflow will collect the event data, enrich it, then log the request in ServiceNow.

    The remainder of this article will show how this works and how it was implemented.

    This is only one approach, you can also log a ticket directly from the Access Request flow, but you have no control over the data sent to ServiceNow or any formatting of that data. See Integrating ServiceNow with OIG Access Requests.

    Executing the Use Case

    The use case starts with a user requesting access via the WebUI in Okta Access Requests.

    This can be any request with any approval and other steps. In this case it’s using a dummy (bookmark) app in Okta. The user supplies answers to the questions and submits the request.

    Once any approvals are completed, actions are run and the request is closed, as shown on the administrators view below.

    Note the highlighted information in the request, like the questions, approvals and actions. This will be leveraged in the ServiceNow request (ignore the second action to log a ticket in ServiceNow – that was just done for comparison).

    When the request is closed, an access.request.resolve event is written into the Okta System Log for this request.

    Within Okta, an Event Hook is configured to call an Okta Workflow via an API Endpoint. This triggers the workflow which extracts the event data, enriches it and writes a new request into ServiceNow.

    The request in ServiceNow contains some of the standard fields (and you can specify which fields to set). Notice the formatting in the Description, Short description and Special instructions fields. These have been built in the workflow based on data passed in the event, an API Call to the request, and Okta user profile lookups.

    Now let’s look at how the pieces are put together.

    Exploring the Configuration

    The main sections of the flow are:

    1. OIG Access Requests to Okta System Log
    2. System Log Events and Event Hook,
    3. Okta Workflow to write to ServiceNow

    These are detailed below.

    OIG Access Requests to Okta System Log

    Any request will log events in the Okta System Log. For example, if the request is adding a user to a group you will get an event for that. Two new OIG-specific events have been added recently – access.request.create when a request is created (user clicks submit) and access.request.resolve when the request is marked as completed. These new events provide a richer set of data than the standard group membership and application assignment events.

    It is worth noting that the access.request.resolve event will only trigger when the access request is marked as done. If you have a flow that grants access, runs a timer, then removes access, the event will not be written until the last action (remove access) is run.

    Every OIG access request will create these events in the syslog, so if you don’t want Workflows processing them all, you will need to apply Event Hook filtering or code some checks into the flows.

    System Log Events and Event Hook

    Whilst we’ve had group and application events from OIG Access Requests, the new events provide more information about the request, specifically in the DebugData and Target objects as shown below.

    The DebugData contains a lot of information about the requester, request, and owner. The Target contains the type (“ACCESS_REQUEST”) and request name which can be used in an Event Hook Filter.

    To trigger a workflow from this event, you need to create an Event Hook that uses the Invoke URL of the API Endpoint card of the workflow (see below). The event hook could be listening for access.request.create events, access.request.resolve events or both. Given that the important data (like approvals) won’t be available until the end, I have used the access.request.resolve event only.

    If you don’t want every access request to trigger the workflow, you can use the new Event Hook Filtering mechanism. An example is shown below that leverages the new Target object discussed above.

    If you want to explore the Event Hook Filtering mechanism, there are a number of examples on this blog.

    Okta Workflow to Write to ServiceNow

    A single main workflow, with some utility flows, is used and described below.

    The flow has an API Endpoint card to trigger it. The Invoke URL field is used in the Event Hook above. Note that the alias/client token values are not populated until the flow is enabled/saved.

    The first card in the flow is an API Connector:Close card. This is so the Event Hook does not timeout and retry causing duplicate executions.

    The next three cards are extracting the relevant values from the event body, specifically the data.events.0.debugContect.debugData object and the data.events.0.actor object. Note that there is only ever one events object, thus the [0] reference. The debugData attributes are the most interesting and shown below. They include the Okta Id’s for the requester and owner as well as information about the request.

    In this flow, I checked if the event was for a specific OIG request type. But you could use Event Hook Filtering as mentioned earlier.

    We go off and read the Okta user profile for the requester to collect some information. This is formatted into a text value that will be used in the Special Instructions field of the ServiceNow request. This is just an example – you could use anything.

    The next step uses the requestId from the event body debugData. It calls a subflow that will use an OIG API (currently in beta) to get the request object.

    Out of this request object, the questions (requesterFieldValues), approvals and actions lists are extracted.

    It checks for any approval steps that were NOT approved and continues if none were found. We don’t want to log a ServiceNow request is it wasn’t approved, and this is the earliest in the flow we can check it.

    For each of the questions, approvals and actions, we strip out and format the key information using subflows and then write the resulting strings into a single field that will be used as the (long) description.

    A short description is composed. Then all of these are used to create the request using the ServiceNow:Create Request card.

    Again, this is just an example of the fields populated in ServiceNow from the workflow – there are many more that could be used, particularly when you have an established ServiceNow deployment with standards and processes.

    Conclusion

    You can use a combination of Okta Identity Governance Access Requests and Okta Workflows to create a request in ServiceNow. This is useful where you need to log a ticket for manual processing, but want all access requests to run through OIG Access Requests.

    This article has shown the design of the solution, a sample execution and the components configured to implement the example. Hopefully this will help readers implement similar mechanisms.

  • OIG Access Requests – Cancelling a Timer

    If you’re familiar with the timer feature in Okta Identity Governance (OIG) Access Requests, you may have wondered if you can cancel a running timer and if so, how? Let’s show how it can be done. If you’re not familiar with the timer feature, have a read of this article: OIG Access Requests – Using the New Timer Feature.

    A timer is used to pause execution of an access request flow (request type) in OIG Access Requests. You may want to automatically revoke access after a set period of time (e.g. remove a privileged access two hours after it was granted) or on a set date (e.g. user only needs access until a date). A question that often comes up is how to stop a running timer. A timer is an action in a request type and like other actions, you can interact with them via the task view.

    To do this you need to be in the team owning the request type. Go into the request and look at the Tasks in the right pane. If the timer is running, you will see a clock icon beside it. Click th

    There is only one action option for a timer – End timer. It will popup when you click the clock icon.

    Click it and you will be shown a confirmation dialog.

    To stop the timer, click Yes, end the timer.

    The timer icon will now be green indicating it has stopped (this is the same as if the timer had run to completion).

    As can be seen above, the steps dependent on the timer will then run. As an admin in the owning Team, you may be able to disable subsequent steps.

    That’s it, hopefully very straightforward.

  • OIG Access Requests – Public or Private?

    If you have looked at Okta Identity Governance Access Requests, you will know that a request will contain the history of the activity, such as the questions asked and answered, approval steps performed and actions taken. Did you know that a request, with all this information, can be Public or Private?

    Did you know that requests can be toggled between states?

    If you do nothing, all requests in Access Requests will be public. This is the default state where anyone who has access to the Access Request UI can see the request, even if they aren’t the requester, approver or a member of the Team owning the request (to see more information on Teams and how they are used, see OIG Access Requests – Understanding User Grouping). This may not be the desired outcome.

    There are two ways you can set requests as private – on each request or at the Team level.

    First, let’s look at setting individual requests to private. You can do this from the request summary view or from within the request. From the summary view, select the “three vertical dots” icon and select the Make private option.

    To do it within a specific request, again use the “three vertical dots” icon and select the Make private option.

    You will see a popup indicating the request was marked as private and a message in the main body (history) saying the same thing.

    If you look at the top of the request (or on the summary page, see above) you will see the private icon.

    The second approach is to set this privacy setting at the Team level. When this is done, any requests owned by that Team will be automatically made private.

    To do this, go to the Team and edit it (again with the “three vertical dots” icon).

    On the Team edit screen, toggle on the Request privacy option and save.

    Once this is done, any attempt to view a request by someone who is not the requester, an approver for the request nor an owning Team member, will not be able to see access the request.

    You should consider whether you want your requests to be private or public. In most cases you would want the information to be private. To save end-users having to flag a request as private each time they raise a request (or a Team member having to do it each time) it’s recommended that you set privacy at the Team level.

  • OIG – Triggering Workflows From Access Certification Reviews

    Okta Identity Governance (OIG) provides an access certification component for reviewing users and their access. When reviewing access, a reviewer (such as a users manager) can approve or revoke the access (or reassign). With the revoke action, the access certification campaign can be configured to automatically remove access or do nothing (i.e. leave the access as is).

    But what if you want to have some custom processing around a revoke action (or an approve for that matter)? This is where you can leverage Okta Workflows. This article will explain the mechanism to trigger a workflow from a campaign and how to access the data passed in the event. It won’t go into detail on how to build workflows – there are many articles around on here (http://davidedwardsphotos.com/iamdavid/) and other sites (like https://maxkatz.net/).

    Overview

    First, some terminology to set the baseline:

    • Campaign – this is a dataset of accesses to review over a period of time, such as group membership or application assignment.
    • Review – this is a single item in a campaign, such as a user group membership or user app assignment
    • Reviewer – the person reviewing the access, such as the users manager or application owner
    • Event – here were are referring to an event in the Okta System Log
    • Flow – an individual workflow in a Workflows folder
    • Connector – a Workflows connector

    The mechanism to trigger a workflow from an Access Certification campaign is fairly straightforward:

    1. Any action (decision) on a review (approve, revoke, reassign) or campaign event affecting reviews (e.g. end campaign) will write an event into the Okta System Log,
    2. A flow is configured to be triggered when that event is written to the system log (using a new event in the Okta Connector), and there are two ways this can be done, and
    3. The flow is passed the event details (in an object), which it unpacks and uses to perform some custom action such as logging a ticket in a ticketing system or sending an email.

    The following sections look at the event, how to trigger a flow off it and how to process the event details.

    Campaign Events in the Okta System Log

    I will use an example to show the data flowing through the system. I created a simple group membership campaign, launched it then had one of the managers perform their reviews.

    These three reviews will trigger multiple events in the Okta system log. There are two event types related to the review:

    • certification.campaign.item.decide – the decision, such as the approval or revoke, and
    • certification.campaign.item.remediate – the remediation taken as a result of the decision

    You can trigger a workflow via an Event Hook for either event. If you want to use the Okta Connector to trigger, you can only do it on the decide event.

    There are also events for campaign launch, update and close (e.g. certification.campaign.launch).

    All events in the Okta System Log have the same overall structure, its only at the DebugData level that campaign-specific attributes are used. We will focus on the certification.campaign,item.* specific attributes.

    The certification.campaign.item.decide Event

    Let’s look at the certificatiion.campaign.item.decide events.

    We can see the three events corresponding to the reviews by the manager, two approves and one revoke.

    Expanding the REVOKE event, at a high level we see Actor (reviewer), Client, Event, Request and Target (review item) as you would for any System Log event.

    The Client and Request sections are of no value for campaign review events, so we will ignore them.

    Drilling in further we can see the Actor attributes tell us about the reviewer.

    The Event section contains a wealth of information about the review.

    Of note is the DisplayMessage, Result and all of the data in the System.DebugContext.DebugData section. This includes the decision and notes, the principal (user who’s access is being reviewed), the resource (including type and name) and template (i.e. campaign). This rich set of information is very useful for running actions in response to a review.

    The Target section provides some information but is rehashing the DebugData information above.

    You will get the most value out of the Event data, and perhaps the AlternateId (Okta username) of the reviewer in the Actor section.

    The certification.campaign.item.remediate Event

    The remediate events have the same overall structure. The Client and Request sections provide no value for these campaign events. The Actor section details the reviewer and the Target section consolidates information about the review item that is detailed in the Event section.

    The Event section information, specifically the System.DebugContext.DebugData, is the same as in the decide event. The decide event has four more attributes (RequestId, RequestUri, TargetEventHookIds, and Url) which may be useful for using in workflows.

    One benefit of the remediate event over the decide event is the Event Info summary (top level of event view in System Log) and the Event.Outcome.Result value. If there is an issue remediating access (requiring manual remediation), the remediate event will show a result as SKIPPED, whereas the corresponding decide event will show SUCCESS. If you wanted to build flows specifically for manual remediation, then knowing the remediate event result may be of value. But as mentioned earlier, you can only get this event type via an Event Hook and API Endpoint, not via the Okta Connector.

    Key Campaign Review Item Event Attributes

    The following table lists the key attributes in the Actor and DebugData sections that are relevant to campaign review events. (Note that the attribute naming below is as per the Event, not the object you will work with in workflows).

    Attribute Description and Use
    Actor section:
    .AlternateId Okta username for the reviewer. Note that this field is not exposed in the DebugData, so if you want this attribute in your workflow, you can use this one (or get the ID and do a lookup into Okta).
    .ID Okta Id for the reviewer.
    .DisplayName Okta full name for the reviewer.
    .Type This will always be “User” for these events (but could be different for other System Log events)
    Event.DisplayMessage Display message like “Access certification review decision: REVOKE”
    Event.EventType certification.camapign.item.decide or .remediate
    Event.Outcome.Result The result of the event – it should always be “SUCCESS” for a decide event. For a remediate event it may also show “SKIPPED” if the access couldn’t be remediated. This field may be useful for error checking on workflows.
    Event.System.
    DebugContext.DebugData
    .CampaignId Object Id for the campaign (can be used in Campaign API calls to get more info about the campaign)
    .CampaignItemDecision Review decision – according to the API docs, the values are: “APPROVE”, “REVOKE” or “UNREVIEWED”. However I have seen “DELEGATE” in one event.
    .CampaignItemDecisionNotes If the review has added a note when approving, revoking or reassigning
    .CampaignItemId Object Id for the review item (can be used in Review API calls to get more information about the review item)
    .CampaignItemPrincipalId Okta Id for the user who’s access is being reviewed
    .CampaignItemPrincipalName Okta full name for the users who’s access is being reviewed
    .CampaignItemRemediation Remediation action taken in response to revoking access. Will be “DENY” or “NO_ACTION” depending on the remediation settings of the campaign.
    .CampaignItemRemediationStatus The status of the remediation. According to the API docs, the values are: “ERROR”, “MANUAL”, “NONE”, “OPEN”, or “SUCCESS”
    .CampaignItemResourceId Okta Id for the resource (Group or Application) that the user is assigned to
    .CampaignItemResourceName Name of the resource (Group or Application) that the user is assigned to
    .CampaignItemResourceStatus Status of resource in Okta. Groups should always be ACTIVE, but applications may show as “ACTIVE” or deactivated (not sure of enumeration).
    .CampaignItemResourceType “APPLICATION” or “GROUP”
    .CampaignItemReviewerId Okta Id for the reviewer. This is the same as Actor.ID
    .CampaignItemReviewerName Okta full name for the reviewer. This is the same as Actor.DisplayName
    .CampaignItemTemplateId This is a legacy item that is not of any use
    .CampaignItemTemplateName Name for the campaign
    Important System Log attributes for Campaign Reviews

    To get a better understanding of the OIG data objects, like Campaign and Review, have a look at the API docs: https://developer.okta.com/docs/api/iga/.

    Now that we know the events and data sent to the system log, let’s look at how we can get the event data into a workflow.

    Triggering a Flow From This Event

    There are two main mechanisms to call a workflow and pass the event data:

    1. Setup an Event Hook and have a workflow triggered by an API Endpoint, or
    2. Setup a workflow that uses the Okta Connector with the new Event

    We will explore both. There are other less effective (and less performant) ways, but we won’t discuss them.

    Trigger Workflow with Event Hook

    Event Hooks in Okta allow callouts to external URLs based on specific events occurring in Okta. This includes the certification.campaign.item.decide and certification.campaign.item.remediate events.

    To use this mechanism you will need a workflow triggered by an API Endpoint and an Event Hook configured to call that API Endpoint. Let’s start with a simple flow that has that trigger and a single Object:Get Multiple card to expand the data.events part of the event object.

    We can see the API Endpoint settings by clicking the icon at the bottom of the card.

    We won’t go into details on this. See https://help.okta.com/wf/en-us/Content/Topics/Workflows/function-reference/HTTP/http_accept.htm for more details. The Invoke URL is used in the Event Hook.

    This Event Hook is looking for the certification.campaign.item.decide event.

    For the remediate event you select a different event in the hook.

    With this Event Hook active, any review decision event will trigger the flow. For example:

    It has pulled the data.events portion (list of objects) out of the body object. The contents of this look like below.

    Note that the data and structure is the same as the event in the System Log. Well, almost. The data.events is actually a list of objects (you don’t see this in the System Log view) as are some of the objects within (like target). You need to be aware of this when processing event details (see below).

    Note – there is a new Event Hook Filter feature rolling out that means you can have specific hooks (and thus specific workflows) for different events of the same type.

    Trigger Workflow with an Access Certification Decision Card on the Okta Connector

    The Okta Connector card in Workflows has been extended to include an Access Certification Decision event (https://help.okta.com/wf/en-us/Content/Topics/Workflows/connector-reference/okta/events/accesscertificationdecisionsubmitted.htm). This will trigger a workflow when a decision event arrives in the System Log. This can only be used for the decide event, there isn’t an equivalent for the remediate event.

    As with the Event Hook method, the workflow is presented with the Event details for processing.

    Expanding the Event Details object shows the same content as above.

    Note that approach this has returned a single object (i.e. the Event Details object), whereas the API Endpoint approach returns the entire event and you need to strip out the event details (data.events) AND select the first item in the array (data.events[0], or data.events.0 in a Object:Get Multiple card).

    The Connector event also returns the Actor, Debug Context and Debug Data objects in their own right, so you could directly access them rather than unpacking the entire Event Details.

    Obviously these objects/fields are much easier to work with instead of unpacking higher level objects in the event details. The next section looks at how we can unpack the data.

    Processing Event Details in the Flow

    The data that you need out of the review decision event will depend on what processing you want to do in the workflow. You will definitely need some of the attributes in the debugContext.debugData object. You may also need some of the Actor details.

    How much unpacking/data processing depends on the mechanism used to trigger the workflow:

    • If you have used the Event Hook / API Endpoint mechanism, you will need to use an Object:Get Multiple to unpack the whole event object down to the attributes you need
    • If you have used the Okta Connector event, you only need to unpack the Debug Data object (and use any of the Actor attributes directly).

    The following sections show examples.

    Extracting Event Details from Event Hook / API Endpoint Mechanism

    If using this approach you have a bit more work to unpack the campaign review details. The following example shows extracting some debugData attributes.

    It uses three Object:Get Multiple cards to 1) extract the data.events.0 (first array element) object, 2) extract the debugContext.debugData object, and 3) extract specific fields. You could combine this into one Object:Get Multiple card, but each attribute would need to be fully specified (e.g. data.events.0.debugContext.debugData,campaignItemDecision) which could be painful (and prone to typing mistakes as the fields aren’t wide enough to see the full string).

    When a campaign review is performed you seen an output similar to the following.

    You would then use these attributes in the rest of the workflow.

    Extracting Event Details from Connector Event

    This approach is much simpler than above as the Connector Card event already breaks out the Actor object and the Debug Context and Debug Data objects. In this case a single Object:Get Multiple card will extract the details. In this example, the Actor.Display Name field is also used in this flow but is off to the right (not shown).

    This results in a similar outcome to the previous example.

    Again, you would use the event details attributes to drive the flow. The above example shows doing a lookup for the user (principal) in Okta then deciding whether to proceed with the flow (only if the Decision is APPROVE or REVOKE).

    Conclusion

    Understanding the mechanisms to call an Okta Workflow in response to an Access Certification Campaign, and the data passed to the workflow, is critical to being able to build workflows to implement some custom remediation processing. This article has looked at the data objects written to the Okta System Log and passed to workflows, the two mechanisms to trigger a workflow from that System Log event, and how to unpack and use the data.

  • OIG Access Requests – Clearing “Stuck” Requests

    When working with Okta Identity Governance (OIG) Access Requests, you may find a request in a “stuck” state, where you can’t complete a step or the request doesn’t automatically close when done. Perhaps you’re testing a new Request Type and missed a step or have something misconfigured when you tested it. As an administrator you may need to force it.

    The following is an example of a common problem where you need to set or change the administrator to be able to force completion…

    I have some requests that have been sitting in an Open state for ten months.

    If I select one of the requests, I can see it has no Assignee.

    If I look at the Tasks, I can see there’s a Provisioning task, but the icon is greyed out and cannot be actioned (a Provisioning task is shown, but it could be any task having issues).

    If you go back to the Info tab, you can change the Assignee to yourself (assuming you’re an admin in the Team that owns the request type).

    You should be able to now action the Task (in-fact, as you change the Assignee, a number circle should appear beside the Tasks tab).

    For most tasks, you can click the Mark task as complete without running action button (or Approve/Deny an approval task).

    You should see that task is now flagged as completed.

    Finally, if the request is not set for automatic completion, you should be able to click the Mark as Done button.

    Hopefully this article helps you force stuck requests in OIG Access Requests.

  • Reassigning Managers for an Access Certification Campaign

    A common requirement for Identity Governance and Administration (IGA) controls is for reassignment when a reviewer, like a manager, goes on leave. Okta Identity Governance (OIG) currently supports manual reassignment of access certification reviews by an administrator or by the reviewer themselves.

    But what about automatic reassignment based on a change to the user profile, such as from a feed from a HR system? OIG does not currently support this out-of-the-box, but can do so using Okta Workflows with the OIG APIs. This article shows an example of this and could be used as a basis for a tactical solution before it is available in the product.

    Note – at the time of writing this the OIG APIs were in beta.

    Overview

    As mentioned above, this solution implements an automated manager reassignment in active Access Certification campaigns where the reviewer is the manager. It is based on two assumptions:

    1. That Access Certification campaigns will be launched regularly with the users manager (using the managerId field in the Okta user profile) as the reviewer
    2. Some process is maintaining specific (custom) reassign fields in the same user profile

    The solution and it’s context is shown in the figure below:

    In it a campaign is launched with the reviewer being the users manager. At some time after a campaign is launched, there is a feed from a HR system setting a temporary manager for the user, with a start and end date for the reassignment.

    Periodically (perhaps daily) an Okta workflow runs to get all users with active reassignment values set (i.e. between start and end dates) and stores them in an Okta workflow table. This was done to allow for build/test, as well as for future re-use of the flows for access request reassignment. Then a second set of flows runs to find all active campaigns, find all unique manager reassignments, then go through the active campaigns and reassign to the appropriate new managers. It can run for multiple active campaigns, and for multiple user reassignments. Details in the following section.

    After the second set of workflows run, the reviews for the affected users have been reassigned to the temporary manager.

    Reassigning Managers

    This section of the article walks through an execution of this solution.

    Campaign Launched

    The first step in testing this was to launch a campaign against a resource including some users who will have their managers reassigned. In this case I setup a test group (“Test Reassign”).

    You can see three users with a manager of Frank Grimes.

    Manager Reassignment from HR (or other)

    The solution is based on three new (custom) attributes added to the Okta user profile

    • A Reassign Start Date (reassignStartDate) in the form YYYY-MM-DD
    • A Reassign Temp Manager (reassignTempManager) with the username of the new (temp) manager
    • A Reassign Stop Date (reassignStopDate) in the form YYYY-MM-DD

    Some of the workflows look for these specific fields, and expect the data to be in the specific format.

    In a real deployment these fields would be automatically populated, perhaps from a HR feed, and massaged in the profile mapping. But for the sake of this test, I set the fields directly in the user profile for the three users shown above.

    Workflow Execution

    With an active campaign, and three users with reassigned managers, I ran the workflows (see details below) to find all users with temp managers assigned, store them in a Workflows table, find all active campaigns, find the unique manager reassignments and update the unprocessed certification reviews.

    For the test I ran them manually, but you would schedule them to run daily. They would be run periodically to catch any new campaigns launched since the last execution (as the campaigns would be looking at the standard managerId field, not the new one).

    Results

    As a result of the execution of the workflows. the reviewers have been reassigned to the new manager (in this case Monty Burns).

    If the workflows were rerun before any other campaigns were launched, they would not find any reviews assigned to the old manager (Frank Grimes).

    The flows only assign the new manager within the reassignment window. They do not revert back to the original manager after the reassign period ends (although it could as easily be done in Workflows).

    Understanding the Flows

    The main focus of this article is on the Okta Workflows components used to implement the solution. As with all Workflows solutions, it uses both Tables and Flows. The flows are shown below.

    The following sections briefly describe the tables and flows.

    Tables

    There are three tables used by the workflows:

    • Environment Variables – this table stores the variables used by the flows, such as the API token to make the OIG API calls
    • User Managers – this table is used if the R10 flow is run to identify all users with managers (managerId) specified in Okta. It is not used by the main flows.
    • User Reassignments – this is the main table used between the first set of main flows and the second set.

    The User Reassignments table is storing each user that has an active manager reassignment (i.e. date run is between the start and end dates). It’s storing information from Okta about the user, the regular manager and the new (temp) manager. Data held includes the Id, username and fullname. Also the reassignStart and End dates are stored.

    The tables will be mentioned below.

    Main Flows

    There are two sets of main flows – the M0* flows to get active reassigned users, and the M1* flows to reassign reviews.

    The M00 flow will create a search argument for the current date being between the reassignStartDate and reassignStopDate. It uses this search argument with an Okta List Users with Search card. The returned users are streamed to the M00a flow. Thus subflow will extract the user data, lookup the manager and new manager IDs, reformat the reassign dates and store the records in the User Reassignments table.

    The M10 flow will perform the review reassignment. It builds the API authorisation header and gets the Okta domain (both using utility flows), gets all active campaigns and stores them in an object (with the M11 flow), strips out a unique list of managers/new managers from the object (there is an assumption that a manager will only ever be reassigned to a single new manager), then for each unique manager/new manager pair, it uses the M10a flow to process it.

    For each manager/new manager pair, M10a the review data, then builds and uses the M12 flow for each active campaign. The M12 flow then builds and runs the OIG API calls to get the relevant reviews and reassign them.

    Most of the workflows use standard workflows functions and Okta connector actions. However there are examples of using OIG API calls:

    • Call to list all campaigns and filter for only the active ones – in M11
    • Call to list all reviews with a specific reviewerId and campaignId and filter for only the unreviewed ones – in M12
    • Call to reassign reviews to the new reviewer (this was straightforward as the reviews call returns the reassign URL) – in M12

    These could be used as examples of how to make OIG API calls.

    Report Flows

    The R10 flow will list all users and their assigned manager. It reads all users in the Okta instance, streams each one to the R10a flow to get the manager and writes out the user and manager userids. This is not intended to be regularly run – it’s a tool to assist testing.

    Utility Flows

    There are a number of utility flows, some that I use regularly:

    • U00 – Get AuthZ Header – this builds the authorization header for API calls
    • U01 – Get one env variable – this reads the Environment Variables table to get one specific environment variable based on a key passed in (like the Okta domain)
    • U02 – Get User Name – builds a username from either a fullname or first + last name
    • U03 – YYYYMMDD to Standard Date – for date conversion

    This concludes the discussion of workflows components.

    Conclusion

    Whilst Okta Identity Governance (OIG) supports manual reassignment of reviewers, it doesn’t yet support an automated mechanism. However, as this article has shown, you can easily build a solution and implement it by extending the Okta user profile and Okta Workflows leveraging the OIG APIs.

  • Access Certification – Helping Reviewers Decide whether to Approve or Revoke Access

    The user interface, and general user experience, has been a challenge with Identity Governance and Administration (IGA) products for many years. Unlike many IT products, IGA solutions are used by all business users and need an easy to use and understand interface. This is particularly so with Access Certifications – business owners (like managers or application owners) need a painless experience when reviewing access. Access Certifications are a necessary evil, but rarely are they the most important thing for business owners to think about.

    When designing and building Okta Identity Governance (OIG) a key focus has been on the user experience. With access reviews this means providing only the important information to help reviewers decide if access should be retained or removed. This article looks at the Okta Identity Governance access review page and how information is presented.

    Note that some of the content presented here may be from the oktapreview environment and may not be in production yet.

    Review Summary View

    The main (summary) view of a campaign shows all access reviews for a reviewer. If the reviewer was a manager they would see all users assigned to the resource (group(s) or application(s)) reporting to them.

    This page is designed to act as a “to do” list for the reviewer. It contains a summary of their reviews and a list of all the pending reviews. The pending reviews section shows the User, their Email, the Resource name (label) and Actions (Approve, Revoke and Reassign). This table view is deliberately uncluttered.

    There is additional information available via a slide out window, the Review details view. To access this view, you click on the review you are interested in. In the example above, we can see a single user assigned to the resource OIG Salesforce.com. Clicking that row will cause the slide out window to appear.

    Review Details View

    The Review details section has three areas: User Details, Resource Details and History.

    The User details section pulls attribute values from the (Okta) user profile, such as status, title, department and manager.

    The Resource details information varies by resource type. For Groups, you currently only see the group name. For Applications, you will see the label (name) and application, when it was last accessed (if it’s a SSO app), when it was last reviewed and assigned. This information can be very useful for determining if a user should retain access.

    For specific apps, like Salesforce.com and Microsoft Office365, entitlement information will also be shown if assigned. This may be roles or licenses or other entitlements. The following shows two examples.

    Finally the History section shows the certification history for this user assigned to this resource. This is also very useful when deciding whether to approve or revoke the access.

    The information presented to help reviewers is expected to grow over time.

    This article has shown how information is presented to reviewers to help them make that review decision, whilst keeping the interface clean and easy to use.

  • OIG – Certification for External System Entitlements

    A common ask for Okta Identity Governance (OIG) is to be able to do access certification on external application data. Currently OIG can only run campaigns on objects (group memberships and application assignments) in the Okta Universal Directory (UD).

    Importing of external system entitlements is on the product roadmap. But with some understanding of the UD data model, Okta Workflows and the new OIG API (currently in beta), a solution can be built to import external entitlements in Okta, create groups to represent the entitlements and run a campaign against them.

    This article shows an example of a solution that has been built for some customers recently. As always, this is not officially supported code, but should be considered an example of how to implement the requirements and use the OIG APIs. It is designed for test data and may not cope with tens of thousands of user-entitlement entries; it has only been tested on a small volume; it stores user-entitlement entries as rows in a Workflows table and a single list of objects in a main flow. YMMV.

    To use this mechanism there is some pre-work needed, then the data needs to be imported via one of the import flows, a flow is run to use the data to create the appropriate objects and relationships in Okta, and finally a campaign is built and launched. For the import there are three options to load the data: 1. Google Sheets, 2. Excel Online, 3. Google Drive.

    Overview

    Okta Identity Governance (OIG) does not currently support importing external apps and their access entitlements into Okta. This integration, implemented in Okta workflows, provides three examples of importing a CSV file into an Okta workflows table, taking that data and creating groups to represent the entitlements and associating them with the app, and then creating and launching a campaign.

    The end result is an Access Certification campaign, with users assigned to the external app, and the resources to review being the “groups” which are shown as an app-entitlement label.

    The remainder of this document will walk through the configuration of this. The following sections are a summary. More detail is provided in the pdf stored with the .folder file here.

    Pre-Work

    The flows will load a CSV file that contains firstName, lastName, email, managerEmail, appName, groupName (the last field, groupName, is the app entitlement to be used and defined as a group). Throughout this article external entitlements will be referred to as “groups” but they could be any entitlement tied to a user.

    The following is required to run the flows to import and use the CSV file:

    1. Create a dummy (bookmark) app to represent the external app
    2. Create the User-Groups CSV file
    3. Import the .folder file (see link above)
    4. Setup the Environment Variables table (this set of flows uses a table for common variables used, like apiTokens).

    A sample CSV file is shown below:

    With this done, you would perform the following steps.

    Running the Flows

    As per the figure above there are three stages and five sets of flows:

    1. Step 1 – Import the CSV File into a Workflows Table
      • The M1* flows will import the data from a Google Sheets file
      • The M2* flows will import the data from an Excel Online file
      • The M3* flows will import the data from a file on Google Drive
    2. Step 2 – Use the loaded data to update Okta UD
      • The M4* flows will check the users and app, create groups for the entitlements and add users to them, and assign the groups to the app
    3. Step 3 – Create and Launch an access certification campaign
      • The M5* flows will create a campaign for all of those new groups and launch it

    Notes for each are in the following sections. They will refer to specific flows by the flow number (e.g. M41).

    Step 1 – Import the CSV File into a Workflows Table

    The first step is to import the CSV file and store the contents in a Workflows Table. Samples are provided for Google Sheets (the M1* flows), Excel Online (the M2* flows) and Google Drive (the M3* flows).

    All flows follow the same pattern, consume the CSV file records and write them to a Workflows table. The end result will look like the following.

    There may be some configuration required, such as confirming the appropriate connector is used and that the filename matches. See the pdf for details.

    Step 2 – Use Loaded Data to Update Okta

    Now that one of the methods above has been used to load all the user-entitlement data into the Workflows table, we run another flow to check the data and apply any updates.

    The M40* flow contains the following steps:

    1. Read all the table rows into a common object that will be used for all the following steps
    2. Check all users are valid Okta users by email address using the M41 flow (if any are not valid, the flow will error out)
    3. Check the app is valid by name, using the M42 flow (if there’s no app by the name in the CSV, the flow will error out) and return the app ID
    4. Strip out a unique group (entitlement) list from the CSV data using the M43 flow
    5. For each unique group (entitlement) create an Okta group (name is <app>-<group>), add the relevant users and assign that group to the app using the M44 flow

    When you run this flow you will see in Okta there are new groups created, that they have the users assigned as per the CSV, and the group is assigned to the app.

    With these Okta objects and relationships we can now create and launch a campaign.

    Step 3 – Create and Launch a Campaign

    The last step (set of flows) is to use the new data to create and launch a campaign, where the resources are the entitlements (i.e. groups called <app>-<group>). 

    The M50* flow contains the following steps

    1. Setup some common variables for the two sub flows
    2. Create the campaign using the M51 flow
    3. Launch the new campaign using the M52 flow

    You don’t need to change any campaign parameters. It will set the date as the next day (D+1), run for 30 days, use the user.profile.managerId field for reviewer and it uses a single Okta user (Id stored in the Environment Variables table) for the fallback reviewer. If you want to alter any of these settings, you will need to go into the M51 flow and modify there. 

    Run the M50 flow and you should see a new campaign with the resources being all the groups for the app as per the CSV. The following figure shows the new campaign in the Okta Admin Console.

    Expanding the campaign shows that the resources are the groups that were in the CSV file.

    The detail of the campaign shows that the resource is the combination of app and entitlement (i.e. <appname>-<groupname>). This was one of the design criteria – we needed to show the manager what the external application entitlement was.

    From here it is standard access certification execution. There is no removal of access on a revoke. You could build additional flows that would respond to the review-revoke event and go update the CSV in whichever location (Excel Online, Google Sheet, Google Drive) but that has not been done here.

    Exploring Using OIG APIs in Workflows

    The logic in the M1*-M4* flows are fairly standard – they import external files, process Workflows tables, and integrate with Okta via the Okta connection to manage the process.

    The last set of flows are using the OIG APIs to create and launch a campaign and it’s worth having a look at it as we don’t have many examples yet (and we don’t have an OIG connector).

    The following sections look at the main M5* flows and how they’ve been structured. As there is no OIG connector, we have to use the HTTP API functions to call the OIG APIs.

    M50 – Main Flow to Create and Launch a Campaign

    The main flow will setup some variables used in the sub flows (application name/id, domain name, authorization token) then call sub flows to 1) create the campaign and 2) launch the campaign.

    This is a basic flow to make the process more readable – all the steps of M51 & M52 could have been included in M50.

    M51 – Create Campaign

    This flow will used various cards and subflows to build up the body of the request then run the request to create the campaign. The steps are shown in the following figures.

    Setup API URL

    The first step is to construct the API endpoint URL.

    Defining the API URL

    Build the API Call Body

    Then we define the contents of the API Call body, which is a complex object.

    The scheduleSettings define when the campaign will run. In this case we are setting it to launch tomorrow (today + 1 day) and run once for 30 days.

    Defining the scheduleSettings block for the body

    The resourceSettings object defines the resources to be reviewed. In this case we’re pulling out the unique list of groups and defining the object list in a subflow.

    Defining the resourceSettings block for the body

    The principalScopeSettings is set to USERS. The reviewerSettings define how the reviewer is defined, in this case it’s an expression (OEL) using the user.profile.managerId attribute (with a stored ID for an admin as the fallback reviewer).

    Defining the principalScopeSettings and reviewerSettings blocks for the body

    The last block is the remediationSettings and in this case we’re setting NO_ACTION for all three.

    Defining the remediationSettings block for the body

    Then we construct the HTTP body object with all of the attributes and objects constructed above.

    Construct the API call body from earlier steps

    The following figure shows the HTTP body object built by these steps.

    Sample body object

    Make API Call and Retrieve the Launch URL

    Finally we use the URL and body from above to make a POST to create the campaign. We get the launchCampaignURL to return for use in the next section.

    Call API to build campaign and retrieve Launch URL

    M52 – Launch Campaign

    The final step is to launch the campaign. This is trivial as we have the launch URL from the create step above.

    And that’s it, and example of how to use workflows to create and launch a campaign.

    Conclusion

    This article has shown how Okta Workflows can be used to import user entitlement data from an external app into Okta and run a campaign on it. It shows importing a CSV file (via three different mechanisms), creating groups to represent the entitlements and then running a campaign on them

    It also explores how Workflows can setup and make the relevant OIG Campaign API calls to create and launch a campaign.

  • Extracting Okta ASA Audit Log with Okta Workflows

    The audit logs in Okta Advanced Server Access (ASA) can be viewed in the ASA administrative interface or extracted via the ASA Audit V2 API (and this is what the integrations with SIEM tools do). But what about the situation where you just need to extract all the logs and process them somewhere? You could use the API yourself, or use Okta Workflows.

    The flows described in this article were built for a customer to show how Workflows can access ASA Audit logs.


    Background

    Okta Advanced Server Access (ASA) stores every activity, whether its administration of the product or use for server access, in the audit log. The log entries can be viewed in the Logging > Audits section of the ASA interface.

    There is also an Audits API provided (https://developer.okta.com/docs/reference/api/asa/audits/) to allow audit records to be extracted programmatically. Unlike the earlier version of the audits endpoint, the current (v2) endpoint doesn’t provide any filtering of events. It will return a page of events, based on a count you specify, in a given direction from an offset you specify. The offsets for each next and previous page of events is returned in the header of the results. Thus if you store away the offset on each result, you can walk through the available audit events from earliest to latest. This is what the set of flows in this package do.


    Overview

    This solution involves using Okta Workflows to extract the ASA Audit logs from ASA using the Audits API endpoint as mentioned above.

    There is a single main flow that is run on a timer, so it runs over and over. With each iteration it will read a page of audit events from the previous offset for a set count of records. As part of the processing it will store the next offset in a table for the next iteration. It uses a set of flows to format the events and write them into a workflows table.

    The events returned from the API call come in two parts – the summary of the audit event, and related objects that contain more detail about users, servers and other objects in the events. The solution will store the related objects in another table and use them to supplement the summary to provide a more detailed event in the workflows table.

    The first time it runs it starts at the earliest event and over subsequent iterations it will catch up. Once it’s caught up it will continue to run but may not process any events unless there are new events. There are some parameters, like the timer interval, that can control how the flow runs.

    Note that storing events in a workflows table is not a good longterm strategy. If you are considering using this solution, you should also implement a process to offload the events from the table into some form of longterm/scalable storage (like using a lambda function and S3 buckets).

    The next section describes the components.


    The Components of the Package

    As with most Workflows implementation, there are tables and flows. Of the flows, there is a main flow, some subflows and a collection of utility flows.

    Apologies in advance – the following section is very long and detailed. The aim is to give the reader a good understanding of how this problem was solved in workflows.

    The Tables

    There are five tables used in the package.

    They are:

    • Audit Checkpoints – this table has a single row storing the last offset and last record read count
    • Audit Events – this is the end result of enriched ASA Audit events
    • Audit Related Objects – this is the temporary store for the related objects returned with theAPI query
    • Environment Variables – some variables used by the flows
    • Execution Log – a summary log of each execution of the main flow showing events processed and any other useful info.

    The Audit Events table will store the event Id, timestamp, type, actor, user, client, group, project, hostname, server, from_addr and raw_event (depending on the type of record).

    These tables are accessed/managed by the flows.

    The Main Flow

    There is a single main flow called M10 – Recurring Audit Collection. It is scheduled to run periodically to pull a page of audit events via the ASA Audits API, process each one (including enriching the event from the related objects) and writing it to the Audit Events table. The following sections describe it in detail

    Flow Scheduling and Initial Setup

    The first part of the flow is:

    There is the Schedule card (more on this below). Then a utility flow (U00) is used to get the authorization header for the API call. Lastly another utility flow (U01) will get the team name and search count from the Environment Variables table.

    API Call

    The next part of the flow sets up and runs the API call:

    The cards in this section will:

    • Format the API endpoint URL using the team name extracted from the Environment Variables table
    • Get the last offset and date from the Audit Checkpoint table using a utility flow (U10)
    • Add a query string for the API to the URL. If this is the first time through, there is no offset to start at so the query string is just the count of records to return. Otherwise it also includes the offset
    • The API call is run and returns a status code, a Headers object and a Body object

    These lists/objects are used to drive the rest of the flow.

    Analyse API Results For Event Processing

    The next few cards will extract some information to help with the event processing flow:

    The first card is extracting the event list (a list of events) and related_objects (object with a list inside) from the response to the API call. The next card (Length card) is counting the number of audit events found.

    The third card (Get card) is puling the link attribute out of the Headers object from the API call (i.e. the HTTP header returned with the Body). The last card is using a utility flow (U11) to go through that link attribute and find the offset for the next page of events.

    Process Events

    The last section contains a number of conditions to determine if/how to process events:

    1. If the offset returned in the Header is blank, that means we are on the last available page of events.
      1. So if the returned record count is equal to the last record count, there are no new events and there’s no event processing required
      2. If the returned record count is not equal to the last record count, there are now events to process and so the flow should process them
    2. Otherwise (there is a next offset) process the entire page of events

    For the 1.1 condition (above) the flow will only write a record to the Execution Log (using the U20 utility flow).

    For the 1.2 condition where there are audit events on the last page to process it has the following cards.

    The new record count is written to the checkpoint table (using the U13 utility flow). Then the S20 subflow is used to store the related_objects into the Audit Related Objects table (more details on this subflow in the next section).

    The S31 subflow is used to process each event in the events list from the HTTP body earlier (more details on this subflow in the next section).

    The last cards are determining if this iteration is processing the first chunk of events in the page or subsequent events, and writing out the appropriate Execution Log records.

    Note that this branch of the flow does not update the offset. The flow will keep processing the same set of records from the last offset on each iteration until a complete page is presented (and there is a new offset).

    The last branch is where there is a complete page of events returned and theres a new offset.

    The flow is similar to above:

    • A utility flow (U12) is used to write the new offset
    • A utility flow (U13) is used to write the new count
    • The S20 subflow to write the new related objects into the temporary table
    • The S30 subflow to process every event (this is subtly different to the S31 flow mentioned above)
    • A utility flow (U20) is used to write an entry to the Execution Log

    This completes the main flow.

    The Sub Flows

    These subflows are called from the main flow or from other subflows:

    The S20 flow will start by emptying out the Audit Related Objects table, ready for the new entries. It then uses the S21 flow to process each related object with a Map to List card (i.e. you pass it an object and it calls the subflow for each item in the object as if the object was a list). S21 will take each related object and store it in the table by its id, type and contents (json object as a string). These will be accessed by the S32-37 flows.

    The S30 and S31 flows are similar – both will process audit events. The difference is that S30 only processes the event, whereas S31 does a lookup of the Audit Events table for each record before writing it. Where we are processing a full page of events, there is no need to check if the events have been written before, so from a performance perspective it’s better to just write the events. Where we’re processing the last (incomplete) page of events it is probable that records will be reprocessed (each iteration is reading from the same last offset) so we need to check if an event has been written before.

    Other than the difference for the record lookup before processing, both S30 and S31 will extract the contents of the audit event object, then depending on what fields are available they will call the S32-36 subflows to pull more information from the Audit Related Objects table to enrich the raw event detail. These subflows will get client (S32), gateway (S33), group (S34), project (S35), server (S36) or user (S37) details. For example, S30/31 might call S37 with the id of an actor or user in the raw audit record and the subflow would return a string like “linux.test (status: DELETED , usertype: )“. Similarly a call to S36 would return a string like “ubuntu-ad-gateway (project: Gateways, canonical name: ubuntu-ad-gateway, access address: 54.189.181.91, OS: Ubuntu 20.04, OS type: linux)“. These results are used to write the audit events out.

    This completes the subflows.

    The Utility Flows

    The utility flows perform discrete utility functions and may be called from any of the main or subflows.

    The U00-2 flows I’ve used in other ASA API workflows – there’s a flow to setup the authorization header, one to get environment variables (from the Environment Variables table) and one to set (write/overwrite) the environment variables.

    The U03 flow is used to reset the checkpoint (last offset, last event count) values to restart processing the ASA Audit events from the start. The U04 flow will empty the Audit Events table (and write an entry in the Execution Log).

    The U10 flow gets the last checkpoint values from the Audit Checkpoint table. The U11 flow extracts the next offset from a passed link string (from the header returned from the API call) and it has its own subflow (U11a) to process the URL within the link.

    The U12 and U13 flows update the two Audit Checkpoint values.

    The U20 flow is for writing entries into the Execution Log table.

    This concludes the discussion of the components.


    Running the Package

    The package is designed so everything can be done with flows. It leverages an Environment Variables table for some common parameters and an Audit Checkpoint table to track the execution of the main flow. The values are maintained with flows.

    Initial Setup

    The package does not need a specific application connector (even the ASA Audit API call is made via the generic API Connector). Once imported into a new folder, it will have the flows and empty tables. It needs the following configuration:

    1. The Environment Variables table needs two values – the team name (e.g. deadwoods-demo) and the number of events to return on each iteration. You can manually set the table entry or run the U02 flow
    2. The Audit Checkpoints table needs to have a single, but empty row. Run the U03 flow to initialise it.
    3. The Audit Events tables should be empty – it will be when you import the .folder file (but if you want to restart the flows, you can run the U04 flow)
    4. The U00 flow needs to be configured with an API key and secret to connect to ASA
    5. The schedule parameters for the Schedule Flow card in M10 need to be set (see notes below on Performance)
    6. Check the concurrency setting for the calls to S30 & S31 in M10 (towards the very right) – see the performance comments below.
    7. Ensure all flows are enabled (except M10 for now)

    Execution

    To start the flows, enable the M10 flow. It will trigger on the next schedule and run periodically after that.

    You can monitor the execution in the Workflows console (all flows have history on). You can also check the Execution Log table.

    You should see the Audit Related Objects table empty and fill with each iteration of the M10 flow. The Audit Events table will be appended to with each iteration of the M10 flow.

    If there are issues with the flows, you can restart the entire process by resetting the flows.

    Resetting the Flows

    To reset the flows you can:

    1. Turn the M10 flow off
    2. If you want you can offload the Audit Events table to CSV
    3. Clear the Audit Events table by running the U04 flow
    4. Reset the values in the Audit Checkpoints table by running the U03 flow
    5. Turn on the M10 flow

    You do not need to touch the Environment Variables table.


    Additional Notes

    There are some additional considerations around performance and extensions to the solution.

    Performance

    The reason for building this solution was the performance implications of pulling Audit records and the limited means to control this through the API.

    There are three performance-related settings in the flows/tables:

    1. The interaction frequency (interval) for the M10 flow set in the Schedule card
    2. The number of Audit records read on each iteration – this is the searchCount in the Environment Variables table, and it is used in the count= argument for the auditsV2 call
    3. The concurrency set in M10 for the S30/S31 ForEach call. This subflow is the most resource intensive of the whole process as it’s formatting an event record, whilst making multiple calls to read records from a table and writing the event.

    In my testing I have been using an interval of 5 mins (the minimum), searchCount of 500 and concurrency of 10. This allows it to run in the 5 minute window without overlap (the S30 takes between 3 and 4 minutes for the 500 event records). I expect you could increase the number of records read (searchCount) AND at the same time increase that concurrency figure. But I don’t know at what point you’d hit rate limits or break something.

    Extensions

    As mentioned earlier, the ASA Audit events will be written to a Workflows table and that table will continue to grow. This is not a long-term solution, nor is it practical if there’s a lot of audit activity in ASA. The ASA table approach should be considered a temporary store, with additional flows to periodically pull the records from the table, write them elsewhere (like a SIEM or some external storage like a datastore in S3 using lambda functions) and clear the table. This won’t affect the current flows as the M10 flow will continue to process each page of events in ASA based on the stored offset. But you would need to make sure both the M10 flow and any offloading flows aren’t running at the same time.

    Further to the above, this solution is complex enough (if adding in offloading processing) to call for either some sort of master scheduling flow (i.e. a flow to run M10 as required and any offloading flows) or some scheduling software (and make M10 and any offloading flows callable via API endpoints from outside).

    The components in this package were built as a proof of concept. They need some more resilience (like error handling) built in for production use. Also, the API key/secret should be in the Environment Variables table.


    Conclusion

    This article has shown how Okta Workflows can be used to extract Okta Advanced Server Access Audit events using the Audits API and write them to an Okta Workflows table. It leverages the pagination function provided with the Audits API to progressively walk through the pages of audit events. It is provided as an example of how Okta Workflows can be used to access audit logs.