Author: iamdavid

  • Okta Privileged Access and Access Certification – Getting Roles into the Group Description

    As with many SaaS applications in Okta, application entitlement can be managed via Okta Groups pushed to Okta Privileged Access (OPA). This means membership in OPA policies and roles is based on Okta Group membership and thus can be governed by access requests and access certification for those groups.

    In this article we look at how the Okta Group description can be updated to show the OPA roles and polices assigned to help a reviewer in a certification campaign decide if the user should retain access. It shows the outcome and then how the mechanism was built using Okta Workflows.

    Leveraging Governance Controls for Okta Privileged Access

    Okta Privileged Access (OPA) is an OIDC/SCIM application like many other SaaS applications in Okta. Users and groups in Okta can be pushed to OPA, and then connected to the relevant OPA policies or administrative roles. This means the users and the groups they belong to are managed in Okta and can be subject to governance controls provided by Okta Identity Governance (OIG) – such as access requests and access certification for the group memberships.

    If a reasonable naming standard is applied to the groups in Okta, it may be easy for business users (such as managers) to understand what access the group is granting in OPA. But groups in Okta also have a Description field to help understand what the group is used for, What if we could populate these Descriptions with the entitlements (policy and role membership) in OPA? That way when a manager is reviewing access for their people they can get a better understanding of the access they have.

    Both Okta (the Workforce Identity Cloud platform) and Okta Privileged Access have APIs that can be used to build a mechanism to discover what groups are connected to in OPA and update the group description in Okta. Let’s look at the result and then how it was built.

    The Outcome – Roles and Policies in Okta Group Descriptions

    The aim of this is to make life easier for the business user and we do this by populating the Group Description with the OPA roles and polices.

    The group description is a text attribute on the Group profile. So it is perfect place to store additional information about the group. Using the mechanism described later, the group definitions have been updated to reflect the OPA roles and policies.

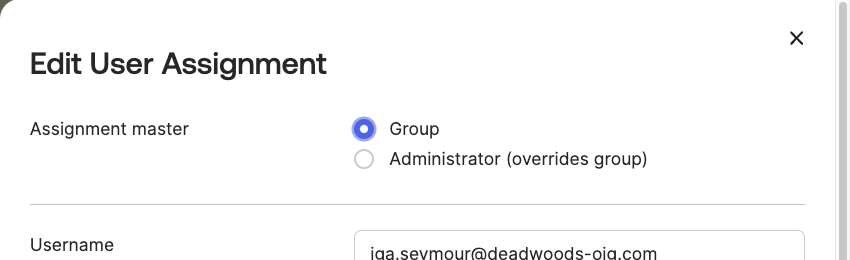
    This group view is in the Administrative Console of Okta, and thus is only useful to Okta Admins.

    But it becomes more powerful when used in an Access Certification campaign visible to non-admins, such as managers that need to periodically review the access of their people. I built a User Access Review (UAR) campaign to look at all users assigned to the OPA application, looking at the direct group assignments.

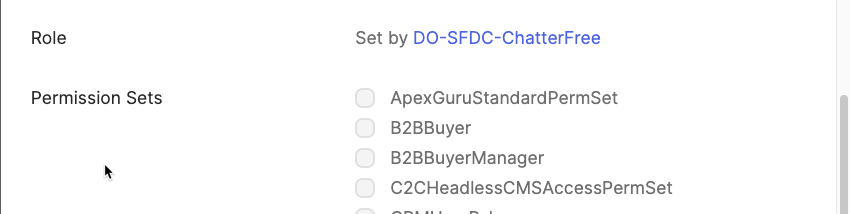
    The reviewer view is shown below, with users and their assigned groups. Clicking into the review row shows details about the user and group.

    If we zoom in on the Resource Details we can see that whilst the description has been truncated, the mouse over function shows all the description.

    Thus the reviewer has detail on what roles and policies this user has access to based on that group membership.

    Now that we understand the outcome, let’s explore how the Workflows-based mechanism achieved it.

    The Mechanism Implemented in Okta Workflows

    Whilst this mechanism could have been built using any programming language supporting the Okta and OPA REST APIs, I chose to use Okta Workflows.

    Overview

    The background assumption for this implementation is that there are groups in Okta pushed to OPA, and those groups are assigned to policies and roles in OPA. The groups in Okta are Okta groups not application/directory groups. Also, that there may already be group descriptions for the groups that should be retained.

    The overall flow of the mechanism is:

    1. Lookup all policies in OPA and store them with the groups that are assigned to them. This is so that when processing OPA groups individually later you don’t need to go back and search all policies again (to minimise API calls).
    2. Find all OPA groups (this will include all the OPA roles assigned to the groups)
    3. For each group
      • Skip if it’s the “everyone” or “owners” group as these don’t map to groups in Okta
      • Get the policies for the group from the table (step 1. above)
      • Search for the group, by name, in Okta and if not found, stop
      • Read the Okta group to get the current description
      • Build the new description from the current (if it’s there), the roles list from the earlier group search (step 2. above) and policies list
      • Update the Okta group with the new description

    This could be run periodically or after any major change to the groups in OPA.

    For the OPA API calls, the generic API Connector card is used (alternatively you could use the Workflows ASA connector). For the Okta API calls, the standard Okta Connector cards are used.

    There are a set of main flows, sub flows and common utility flows.

    The following sections look at the flows to implement this mechanism.

    The Main Flows

    There are two main flows to implement drive this mechanism.

    The MAIN flow works on all OPA groups (steps 1. and 2. above), whereas the MAINa flow works on each individual group (step 3. above).

    MAIN Flow

    The MAIN flow starts by building the common fields needed for all OPA API calls, the authorization header and the prefix (i.e. {opa_url}/v1/teams/{team_name}). This is done in a utility flow (UTL20 – Get API Variables).

    Then it calls another utility flow (UTL40 – Get All Security Policies) to get all policies and security groups and store them in a workflows table.

    Next it uses a subflow (PAM10 – Get Group List) to return all OPA groups. The list retuned includes the roles assigned to the groups.

    Each group object from the list is passed to a subflow (MAINa – Process a Single OPA Group).

    MAINa Flow

    The MAINa subflow will be passed the group object (from the list in MAIN) and unpack the group id, name and list of roles.

    It checks that this particular group is not the “everyone” or “owners” group and, if not, it continues on.

    Another subflow (PAM20 – Get Policies for Group) will find all entires in the policies-group table (built earlier) and return the list as a string.

    It will then use the Okta Search Groups card to try to find the OPA group in Okta by name. If it can’t there will be a null Id returned and the flow will stop for this group.

    It will take the earlier roles list (extracted from the group object in the first card of this flow) and convert it into a string.

    Next it reads the Okta group using the Okta Read Group card and the Id from the search to get any existing description.

    If there is a description present, it will append the new list of roles and policies to it, otherwise it will create a description with the roles and policies.

    Finally it updates the group description with an Okta Update Group card.

    Sub Flows

    In addition to the two main flows, there are a number of subflows being used. In summary the important ones are:

    • PAM10 – Get Group List. This flow runs the List all Groups for a Team API endpoint to get a list of all groups in OPA with details (including the role list) and returns the object list to the calling flow.
    • PAM20 – Get Polices for Group. This flow is passed a group name and searches through the Policy Groups table (built by UTL40) for all policies that this group is a member of and returns the list of policies as a comma separated string to the calling flow.
    • UTL20 – Get API Variables. This utility flow sets up the API URL prefix ({opa_url}/v1/teams/{team_name}) and API authorization header. Documentation on how to setup the bearerAuth token used in the authorization object can be found here.
    • UTL40* – Get All Security Policies. This flow runs the List all Security Policies API endpoint to return a list of all polices, which includes an object list of all groups assigned as principals of the policy. This list of groups is extracted and the Policy Groups table is updated for each group-policy combination. An example is shown below.

    The other UTL** flows are for more mundane tasks such as retrieving values from the environment variables table and doing text filtering.

    That concludes the exploration of the mechanism.

    Conclusion

    Having groups in Okta pushed to Okta Privileged Access and mapped to security policies and administrative roles means that governance controls such as access certification can be used to manage user entitlements in OPA. To make life easier for a business user who needs to review access, the group description for OPA groups can contain the OPA roles and policies that group is connected to.

    This article has shown how this can be implemented and the outcome as shown to the business user. This is just an example to show how the different APIs and Workflows can be used to enhance the business user experience. You could extend the mechanism to make the roles/polices more human-readable if naming standards weren’t helpful. You could also highlight the high-risk OPA-wide roles (pam_admin, security_admin and resource_admin) in the description.

    Hopefully this article shows the value of leveraging Okta Identity Governance with Okta Privileged Access to provide a multi-layered approach to managing privileged access.

  • Okta Privileged Access and the Reports API – Who has Access to What and How?

    With the release of Okta Privileged Access, an API has also been released to provide programmatic access into objects managed by it, such as servers, secrets and gateways. There is a set of Access Reports APIs to allow for external reporting on who has access to what and how. This article explores the APIs, the output and gives an example of using them in Okta Workflows.

    The Access Reports API

    The Access Reports API is a subset of the Okta Privileged Access (OPA) APIs. There are four endpoints:

    • List all Access Reports – list all reports in the Team.
    • Create an Access Report – create an access report for one user or one resource.
    • Retrieve an Access Report – retrieve information about the access report, such as the id and status
    • Download an Access Report – download the CSV contents of the report

    The four endpoints all leverage a URL based on:

    {opa_tenant}/v1/teams/{team_name}/access_reports

    All endpoints require a bearerAuth token derived from a service account that has the security_admin role in OPA.

    Generating an access report is an asynchronous process – you request creation (Create an Access Report) and are returned the Id of the new report. You may see a status of “CREATED“, “ERROR” or “IN PROGRESS” from the Create request. You may also get a status of “COMPLETED” or “COMPLETED_BUT_EMPTY” if the report was generated immediately.

    You could use the Retrieve an Access Request endpoint to confirm if a report has completed (successfully, successfully but empty, or with error) before trying to Download it.

    When you run the Download endpoint, you will get a CSV-formatted block of text, like the following, that you can process.

    There are two types of Access Reports – user and resource.

    • A user access report will show all accesses allowed for a specific user. To create a user access report, you pass it the OPA Id of the user and a resource_type_filter (currently only “server”). To get the Id for a user based on user name, you can use the Retrieve a User endpoint.

    • A resource access report will show all accesses allowed for a specific resource. To create a resource access report you pass it the OPA Id of the resource and a resource_type (currently only “server”). There is no single endpoint to call to find a server based on name – you need to List all Servers and filter through the returned list to find the hostname or canonicalname, and get the Id for the matching server.

    The List all Access Requests will produce a list with all reports, including their id, status and type.

    The Report Output

    The two reports, user and resource, produce similar results but in a slightly different order.

    User Access Report

    A sample output from a user access report is shown below.

    This is showing all accesses a user is entitled to.

    The User Name, Type and Status are straightforward, The Resource Name and Type show the resources this user has access to – in this case three different servers.

    The combination of Account and Privileges shows the user access method for server access. i.e. what account/elevation they can access. For example:

    • larry.linuxadmin + user – user can connect to the server using their individual account without any privilege escalation,
    • larry.linuxadmin + admin – user can connect to the server using their individual account with escalation to admin (root equivalent on Linux, Local Administrator on Windows), and
    • root + user – user can connect to the server as the root account (shared managed account in the vault).

    The Conditions show how the user can leverage the access method:

    • via an Okta Gateway – connection is routed via a gateway, but no session recording
    • via an Okta Gateway with Session Recording – connection is routed via a gateway and the ssh/rdp session is recorded
    • Approval – connection requires an approval from an access request first
    • MFA – connection requires multi-factor authentication

    To see what these accesses look like to the end user, have a look at Leveraging Zero Standing Privileges and Shared Account Access with OPA.

    Resource Access Report

    A sample output from a resource access report is shown below.

    This shows all accesses against a specific resource.

    The columns and values are the same, just that the resource is shown before the user.

    An Example Using Okta Workflows

    You can leverage the APIs from any programming language that supports calling REST APIs or something like Postman (there is an OPA Postman collection). But as I’m a huge fan of Okta Workflows, I implemented all four endpoints in flows.

    Considerations for Workflows

    There currently isn’t an Okta Privileged Access Connection in Okta Workflows. So you have two options:

    1. Call the API endpoints as Custom API commands in the Workflows Advanced Server Access connector. You need to establish the connection initially, but then you don’t need to worry about setting up the bearerAuth token for each call.
    2. Call the API endpoints as generic API Connector functions (e.g. Get, Post). You need to build the authorization header (with bearerAuth token) for the calls within workflow.

    I chose to do the latter.

    If you are using the generic API Connector, you should look at the Authentication section of the API Overview to see how to build the bearerAuth token.

    I used a standard pattern for the main API Endpoint (building block) flows (one or two for each of the four endpoints):

    1. Pass in the relevant Id (user, resource or report) if needed
    2. Build the API Connector inputs. This includes the authorization object (bearerAuth token) for the request header and request URL. A common subflow was used to build the authorization object and URL prefix.
    3. Call the endpoint
    4. Process the body object

    For example:

    This made creating more flows simpler, as there were only minor variations in data in, the URL and how the output was processed.

    The API Endpoint (Building Block) Flows

    I built a basic set of flows around the four endpoints and the two types of reports.

    The RPT1* flows are for the report Create endpoint, the RPT20 flow to Retrieve details of a report, the RPT3* flows are to Download a report, and the RPT40 flow is to List all reports.

    Both RPT10 and RPT15 have the same structure. They will take a username or server hostname, convert that into the relevant id, then format the HTTP POST request body object to generate the report.

    They then use the API Connector POST card to request creation of the report. If the request was successful there will be a 201 status code and the body of the response will contain details of the report.

    The RPT20 flow will retrieve the details of a report based on the report id. The output is similar to above.

    Both RPT30 and RPT35 have the same structure. They will take a report Id and download the report using the API Connector GET card. The body of the response, if successful (status code 200), will contain the CSV-formatted output (as shown above).

    As there is no simple way to convert that output into a file object in Workflows, the output is converted into a list and each row processed individually (by RPT31 or RPT36) and each stored in a workflows table (the results of this are shown earlier in this article).

    Workflows tables can be exported to CSV files for further analysis.

    Stringing the Building Blocks Together for Business Flows

    These flows could be building blocks to create reports of multiple users (e.g. all users in a group) or multiple resources (e.g. all servers in a project).

    The following shows a flow built to generate an access report for all users in a group.

    There are two flows, MAIN2 to get all the users in the group and MAIN2a to generate a report for each user and it to the workflows table.

    The MAIN2 flow starts by setting a group name to process user from. Rather. than coding it into the flow, you could make this a delegated workflow to expose it in the Okta Admin Console and get the user to supply the OPA group name.

    Then it runs a subflow to use some Groups API endpoints to find the group and list the members (by name).

    It checks the returned user list to make sure it’s not empty.

    Then it clears the output table (the one that the reports will be written to). It’s cleared before all the user reports are run, so that the table will contain ALL reports.

    Then it processes each user in a subflow – MAIN2a.

    For each user, MAIN2 will first run the RPT10 flow to create the user access report.

    Then it will wait (30 seconds in this case).

    This Wait For card is to allow OPA to complete the report which is checked with the RPT20 subflow. Ideally you would implement a “do until” loop mechanism where the RPT20 flow would call itself until one of the completed status’ is returned (or until you reach a limit or repetitions). In this case we’re just using the timer.

    If the Retrieve subflow returns a COMPLETED status, the RPT30 subflow is called to download the report and store it in the table (adding to any entries already there).

    The result is as shown below, the report output for each user in the group.

    A similar approach could be used to find all servers in a resource group/project and build a report on them.

    Utility Flows

    As per my usual practice I built a set of utility flows for common functions, such as accessing my environment variables table and finding an Id for a username.

    It is worth showing the utility flow (helper flow) used to construct the authorization object. For this flow:

    • The PAM Okta URL and team name are retrieved by subflows (from storage mechanism of your choice)
    • These are used to build the service_token endpoint

    • The service account key Id and Secret are retrieved by subflows
    • A request body object is constructed with them
    • An API Connector POST is made to the service_token endpoint with the key id & secret object

    • The bearer token value is extracted from the response body
    • It is appended to the text “Bearer “
    • This is converted into an object called Authorization and returned

    You should ensure the key id and secret are stored securely. You should not “save all data that passes through the flow” for any flows that handle persistent security data, such as the service account key id and secret.

    Conclusion

    This article has explored the new Access Report API endpoints for Okta Privileged Access and how they can be used to generate user and resource access reports. It has looked at the report output and how to understand it to determine who has access to what and how. And it has provided an example implementation using Okta Workflows to produce reports and store them in a Workflows table.

  • Leveraging Zero Standing Privileges and Shared Account Access with Okta Privileged Access

    We all appreciate that a Zero Standing Privileges model is the best approach when it comes to privileged access – if a compromised account doesn’t have standing privileges, then the attacker is limited in what they can do. But the reality for many organisations is that there are still shared accounts with elevated privileges that have to be used in some situations – can you really operate a Linux server without using the root account?

    This article looks at how you can provide for both zero standing privileges for individuals, plus shared accounts, with the appropriate controls to minimise risk using Okta Privileged Access.

    User Access Methods in Okta Privileged Access

    When it comes to Okta Privileged Access (OktaPA) allowing connections to servers, there are three user access methods that can be applied: JIT individual accounts, JIT elevated individual accounts, vaulted password accounts.

    Just-in-Time (JIT) Individual Accounts

    Policies can be defined to allow a user to connect to a server with their individual account. For example, david.edwards@company.com in Okta, would access a server as david.edwards after authenticating to Okta.

    By default this account is provisioned to the server just as the user needs it (JIT or just in time), i.e. when making the SSH/RDP connection from their client. When the session ends, the account is removed from the server. (Note that there is an option to make the accounts persistent).

    These are ordinary users without any elevated privileges. This approach is very useful when you want to implement a passwordless access to servers for ordinary users – the SSH/RDP connections use ephemeral credentials that the user never sees.

    JIT Elevated Individual Accounts

    Users, via policy, can be flagged with admin-level access. This is the same as the JIT individual accounts, but on a Linux server they can perform any sudo command and on a Windows server they are added to the Windows local administrators group.

    These are effectively system administrators, but with JIT – they only have the elevated privileges whilst they are connected to the server. This approach means that the need to use shared privileged accounts is reduced.

    Vaulted Password Accounts

    The third category is the shared accounts, such as root, System Administrator, DBA accounts etc. Often they are provided by the OS or service and are needed for specific functions.

    OktaPA can discover all local accounts on a managed server and an administrator can flag them to be managed in the vault. This means OktaPA takes over the password for these accounts, rotates them so no-one else knows it and will use them to access the servers.

    No-one see’s the passwords for these vaulted password accounts – they are injected into the SSH/RDP connection by the client. There is no check-out/check-in mechanism for them.

    Controls in Okta Privileged Access

    There are a number of controls that can reduce the attack surface and thus risk for server access Some are always applied and some optionally applied through policy.

    Ephemeral Credentials or Rotated Passwords

    Where the individual account is used to connect to servers a passwordless mechanism is used. OktaPA mints short-lived certificates for the SSH/RDP connections. Use of ephemeral certificates is a lower-risk approach than traditional passwords or ssh-keys that can be shared and don’t have a time limit. Other security controls are layered over the use of certificates that won’t be discussed here.

    Where vaulted password accounts are used, we still rely on password-based connections. However OktaPA is the owner of the password – no-one else knows the password and you need to use the OktaPA client to get and use the password. You cannot “check-out” the password and see it. The password is periodically rotated. OktaPA is also continually checking the password is still valid and if it detects an out-of-band change, it will rotate it again and write an event to the Okta System Log.

    Entitlement Through Groups, Roles and Policies

    At a course-grained level, for a user to be able to connect to a server, they need to be in a group that is assigned to a policy in OktaPA. The mechanism for this is to use Okta Groups pushed from Okta Workforce Identity Cloud (WIC) to OktaPA and assigned to policies. These groups and their membership can then be managed using the normal controls in Okta WIC, which may include using Okta Identity Governance to provide access requests, access certification and reporting of users in the OktaPA groups.

    The administrative model in OktaPA is very flexible and supports a delegated administration model and flexible policy assignment, so you can limit access to polices and to resources to the minimum needed users.

    Network Routing and Session Recording

    There is a policy flag to route all server connection traffic through a gateway. This network proxying capability means that network firewall rules can be implemented to only allow traffic to servers via the gateways. Also, the RDP connection is running through an OktaPA-initiated SSH tunnel and RDP sessions are not initiated from the client, so external RDP access could be restricted (you may need to retain it for break-glass scenarios).

    The gateway can also perform session recording for SSH and RDP sessions. This is another policy option.

    Per-connection MFA

    User access to anything in OktaPA is controlled by the Okta (WIC) Authentication Policies applied to the Okta Privileged Access application in Okta (the same as any other SaaS app in Okta). This can include requiring multi-factor authentication to establish the session with OktaPA.

    But there is also a policy setting to allow MFA on specific resources. You can require either any two factor types or a phishing resistant factor (like Okta Verify). And you can require it for every connection or only after a specified duration.

    Many security standard call for “per-connection” or “per-server” MFA.

    Access Requests for Server Access

    Another control that can be applied (in policy) to server access is to require approval prior to being able to access the server. This leverages Okta Access Requests (in a restricted-use form of the component shipped with Okta Identity Governance).

    A request flow (called a Request Type) is built in Okta Access Requests to get approval before OktaPA will allow access to a server. For example it may require the users manager or the service owners approval before proceeding. The OktaPA client raises the request for the user and the user retries the connection when the request is approved.

    These controls can be added to policies to support different levels of risk, which we will look at in an example in the next section.

    Example Implementation with Different Access Methods and Controls

    Lets say a company wants to implement server access controls to their Linux server farm.

    They want to allow ordinary users to access some servers with their own personal (no elevated privileges) account, but do so in a passwordless way and leverage normal Okta authentication as they do for SaaS apps.

    They also want to minimise the use of shared accounts (like root) by providing JIT elevation to a root level of access rather than sharing the password around for the root account. They want passwordless access with elevated privileges, but due to the risk they want MFA applied to the user access and session recording applied.

    Finally, there are times where the root account is needed, so they want a way to use the root account without worrying about passwords. But again due to the risk, they want the user’s manager to approve the request and session recording enabled.

    What Does the User See?

    In OktaPA we have implemented these requirements through policy assigned to the Linux servers. When they use the OktaPA client to connect to a server they are presented with the following options:

    There are three options matching the requirements:

    1. The user can connect via SSH using their individual account (larry.linuxadmin). This is a low-risk access, so there are no additional controls other than requiring the access to be routed via a Gateway (for network security)
    2. The user can connect via SSH using their individual account but elevated to admin level. As this is a riskier activity, the session is routed via a gateway, has session recording enabled and requires MFA.
    3. The user can connect as the root account via SSH, which will use the root password stored in the vault. As this is also a riskier activity, the connection requires approval and is also routed through the gateway with session recording enabled.

    If the user selects option 2, they are prompted for MFA (in this case a push notification to Okta Verify running on a phone) and then is connected to the server as themselves. They can then run any sudo command without requiring a password (the user doesn’t have a password for the account provisioned by the OktaPA agent).

    This is because they are in the sft-admin group (a special group managed by the OktaPA agent) which has a sudoers.d rule assigned to allow any command without a password. On a windows server, a similar elevated access policy adds the user to the local Windows Administrators group.

    If the user selects option 3, they get notification that an access request is raised and the command ends.

    Their manager (or whomever is defined in the access request approval step) will get an email notification (or Slack/Teams notification if that’s integrated) telling them that there’s an access request for them to review.

    They can see the details of the request.

    They can approve (or deny) the request.

    Once approved, the user can retry their server connection.

    The Approval condition is now met and they can connect.

    Again they do not see the password. But they are logged directly in as root.

    How is this Implemented in Okta Privileged Access?

    Like everything in OktaPA, these requirements are implemented as resource groups and policies. From a Resource Group perspective, the root user is flagged as managed for the servers.

    There is a single policy for the server access with three different rules to define the three user access methods.

    • The SSH with root rule is granting access to the shared/managed root account with the conditionals of Access Request and Gateway with Session Recording.
    • The SSH with Elevated Principal rule is granting access to the principal (individual) account but elevating access. It has the conditions of MFA and Gateway with Session Recording.
    • The SSH with Principal rule is granting access to the principal (individual) account with no elevation, It only requires routing via the gateway.

    When a user attempts to access a server, the client gets the OktaPA service to evaluate all policies that apply to that user and that server and presents the user access methods.

    The individual policy settings for Gateway/Session Recording, pre-connection MFA and Access Request were shown in the earlier sections describing the controls.

    These policy rules are in the one policy, thus applying to the same principals. But you could have them across different policies so that different groups of users see different options based on their needs.

    Conclusion

    With General Availability of Okta Privileged Access there are different access methods to allow users to access servers. They can access with a just-in-time provisioned individual account, with user-level or admin-level privileges. Or they can use vaulted and managed, shared accounts. Okta Privileged Access offers a number of policy settings to control how a user accesses a server, including requiring additional MFA, session recording and access approval via Access Requests.

    The combinations of these give organisations the means to implement the appropriate mix of Zero Standing Privilege access and access to servers via shared accounts to suit their risk posture. All in a framework that means users never see or know passwords.

  • Introducing Secrets Management in Okta Privileged Access

    This article explores the new secrets management capability within Okta Privileged Access.

    Introduction to Secrets Management

    A key feature of the new Okta Privileged Access product is the introduction of a vault to securely store credentials (or secrets). With the initial release of the product this unlocks two critical use cases:

    • Generic Secrets Management – where the vault is a container for any secret with controls around who can access or manage secrets and how they can access them.
    • Securing Privileged Accounts – where shared admin accounts (such as super admin, shared or service accounts) are discovered on servers (and other resource types in the future), managed in the vault and controls can be applied to who can use these credentials and how.

    This article will explore the first use case.

    For further information on Okta Privileged Access and the concepts in this article, see the Okta Privileged Access page on this site – http://davidedwardsphotos.com/iamdavid/index.php/okta-iam-products/okta-privileged-access/.

    The Vault, Secrets and Folders

    The vault is a separate component in Okta Privileged Access that is built to leverage Amazon Web Services Nitro Enclaves. To quote the AWS website “Enclaves offers an isolated, hardened, and highly constrained environment to host security-critical applications. Nitro Enclaves includes cryptographic attestation for your software, so that you can be sure that only authorized code is running, as well as integration with the AWS Key Management Service, so that only your enclaves can access sensitive material.”. This all resides within Okta’s cell-based architecture (more info in this pdf file).

    To support a delegated management model a hierarchical folder structure is used to store secrets.

    Secrets are name-value pairs, where the value is some encrypted text. It could be an account password, or an API key, or some other bit of text you want to securely manage.

    Secrets reside in folders and security policy can be applied to folders or specific secrets. There are top-level folders and sub folders that can be used to build a folder hierarchy. If a policy is applied to a folder that has sub folders, the policy will apply to all the sub folders. Thus you can structure your folder hierarchy to suit who needs access to specific secrets and folders – perhaps you have a distributed business where there are different owners of sets of secrets.

    Top-level folders are assigned to projects in resource groups. This is for assignment of resource administrators to manage (create, edit and delete) the top-level folders. However this does not apply to sub folders, which are managed based on policy applied.

    Resource Administration and Security Policy

    Okta Privileged Access has been built around a strict separation of administrative duties model. There are PAM Administrators who can assign others to different roles, Resource Administrators who manage the resources, and Security Administrators for managing the policy to determine who can access the resources and how.

    With Generic Secrets, the resources are the secrets and the folders that store them, and the policies dictate what actions can be performed against the folders and secrets. The operations that can be performed are:

    • List secrets or folders
    • Create, Update and/or Delete folders
    • Create, Update and/or Delete secrets, and
    • Reveal secrets

    This means that an administrative role for secrets could involve management of resources, so admins defined as principals in a policy may also need to be delegated administrators of some projects storing folders and secrets.

    You can define security policies to allow users to manage both top-level folders and sub folders (as well as secrets). The exception to this is top-level folders can only be created by resource administrators (or delegated resource administrators). This is because you need to assign policy to a folder, so there must be a top-level folder there at some point. But once a top-level folder has been created you can have a policy to allow others to update or delete it. Note that you can assign admin groups as Delegated Administrators to the Resource Groups containing top-level folders to give the group users full control over the top-level folders.

    The following figure shows some examples of how policy could be defined to manage folders and secrets.

    The “Create top-level folders” box (solid line) represents the resource administrators associated with the resource group / project. 

    The other three boxes show different policies that could be applied:

    • You could have a “Reveal secrets” policy that only allows the policy principals (who the policy applies to) to reveal secrets and traverse the tree to get to them.
    • You could have a “Manage all folders and secrets” policy that allows the principals to create, update and delete all secrets and folders from a top-level folder down.
    • You could have a “Manage some folders and secrets” policy that allows the principals to create, update and delete secrets and folders at and below a specific sub folder.

    These are just examples, and you can tailor your policy to suit your access and management needs.

    An Example of Generic Secrets Management

    Let’s walk through an example to show how the concepts above apply.

    We have a fictional company where they need to manage secrets for some software on servers managed by system admins. They have a multi-department approach where there are admins in each department responsible for managing their own departments secrets, as well as a company-wide security admin team, and then users (like sysadmins) who need to access secrets for specific accounts.

    If you have an environment available, you will get more benefit by following along.

    The configuration in Okta and Okta Privileged Access

    First, let’s look at the configuration in Okta and Okta Privileged Access to support this scenario.

    Okta Users and Groups

    In Okta, the are four Okta users:

    • Sam SecretAdmin – her role is to manage the secret infrastructure across the entire organization
    • Dave DeptAAdmin – his role is to manage the secret infrastructure for DeptA only
    • Larry LinuxAdmin and Louise LinuxAdmin – they are Linux sysadmins who need to access some secrets in DeptA as part of their day-to-day role.

    There are three Okta groups to correspond to these users as shown below.

    All these users are assigned to the Okta Privileged Access application in Okta via the three groups. You could have a single group for all Okta Privileged Access users assigned to the app.

    The three groups are also assigned as Push Groups for the application.

    This means they, and their user membership, are available to Okta Privileged Access to be mapped as administrator roles and/or assigned to policies as participants. The idea of having Okta groups managed in Okta and pushed to Okta Privileged Access is not unique to secrets management, but applies equally across the application.

    Note that none of the groups are assigned to Okta Privileged Access roles. None of the users in these groups needs to be system-wide resource or policy administrators. We will assign the superadmin group as a Delegated Resource Admin in the Resource Group.

    Resource Groups and Projects

    We have created a single company-wide secrets resource group and assigned the superadmin group to it.

    This means that the users in the OPA-Secrets-Superadmin group are resource admins in this resource group and could perform all admin functions on secrets, servers and any other (future) resources in the projects. You can’t scope these delegated admin roles down to specific resource types, so you should limit and manage who is assigned to these roles.

    Note that the admin role assignment is at the resource group level, not the project level, so you may need to think about what the structure of the resource groups and projects needs to be for the admin roles in your implementation.

    Now let’s switch over to Sam SecretAdmin and see what she can do to define some top-level folders.

    Defining Top-Level Folders as the SecretAdmin

    As Sam is in a group giving Resource Administration rights, she see’s Resource Administration in her Okta Privileged Access UI in addition to the user menu items.

    Within Resource Management she only sees one resource group (this system has other resource groups for server use cases). She can edit the resource group and manage the projects within it.

    She can create, update and delete top-level folders.

    But there is no mechanism to create sub folders in these top-level folders. That is based on policy assigned to the folders. This is not something that Sam can do as she is not a security policy administrator (although she could be if needed).

    We can see this by looking at the Secrets menu – there are none showing, even though three top-level secrets have been defined.

    Let’s return to the user who has a system-wide security policy admin role and define the policies we need.

    Define Secrets Policies

    We will define some policies for management of folders and secrets. First we create a policy to grant the superadmin group access.

    We create a policy rule for each of the top-level folders, granting full access.

    Note that you can only have one top-level folder per rule and a policy can have thirty rules. These constraints may affect the design of your policies.

    When published, the superadmin user (Sam SuperAdmin) should see all top-level folders in their Secrets view.

    The policy is working as expected.

    Next we need to create policies to allow both the DeptA admins and DeptA users to have access. As principals are at the policy level, we need two different policies for the two different user groups.

    The DeptA admins policy is set to apply to the DeptA top-level folder and allows all operations on the folders and secrets (we have not included a screenshot). The DeptA users policy is set to apply to the DeptA top-level folder and allows only the list and reveal operations.

    We now have three policies, one for each of the user groups and all published.

    We should be able to manage folders and secrets as Dave the DepartmentA administrator.

    Managing Folders and Secrets

    As Dave (DeptAAdmin) we can see the secrets/folders and actions he can perform.

    First, he can only see the DeptA-Secrets in the Secrets view, not the other two department top-level folders as Sam could. Also, note that the menu items are restricted – Dave is not a resource administrator or delegated resource administrator in Okta Privileged Access so he does not see the Resource Administrator menu items.

    If Dave clicks into the DeptA-Secrets folder, he has administrator privileges in there. There are no secrets or folders yet, but he can create sub folders.

    Once he has created sub-folders, he can then edit/delete them.

    Within a folder he can create further sub folders or secrets. With secrets, he can add, modify and delete them.

    So the Department A admins can administer the folders and secrets. What about the Linux sysadmins who only need to search through folders and reveal secrets?

    User (Linux Sysadmin) View

    If our Linux sysadmin, Larry, goes to Secrets in Okta Privileged Access, they see only the DeptA-Secrets folder.

    They can go into the folder and whilst the create, update, delete functions are shown, they cannot perform those operations. But they can reveal the secrets.

    This shows that the policies setup earlier are working as expected.

    The same result applies if using the Okta Privileged Access client in the command line.

    This can be useful for accessing secrets in scripts, but does require a client to be enrolled and authenticated.

    This concludes the example.

    Conclusion

    Storing and managing access to secrets is a key new use case for the Okta Privileged Access vault, adding to the Securing Privileged Accounts use case for server access.

    In this article we have introduced the secrets management concepts and how it fits into the Okta Privileged Access resources and policy framework. This framework provides for a lot of flexibility in delegated administration of secrets through folders and rights on those folders. Different teams of admins and users can be assigned to different sets of folders and secrets across a company, reducing the risk of exposing secrets to too many people. We have also explored an example of implementing secrets management with different roles of users to see how it’s done.

    This is just the start with secrets management. We have not covered controls, such as Access Requests, around accessing secrets. As the product progresses we will see cloud platform and SaaS app-specific integrations for the vault.

  • Okta Privileged Access and Okta Access Requests

    Okta Privileged Access (OPA) leverages with wider Okta Workforce Identity Cloud capabilities for many use cases. One of these integrations is with the Okta Access Requests components, that comes as part of the Okta Identity Governance (OIG) product, but also ships in a limited form with OPA.

    This article explores the two common use cases:

    1. Access Requests as a PAM Policy Condition
    2. Access Requests to manage Groups used in OPA

    Use of one or both of these use cases allows for a flexible risk-based approach to privileged access.

    For more information on Okta Access Requests, see OIG page and the Access Requests articles on this site.

    Access Request as a PAM Policy Condition

    The first use case supports leveraging access requests as a condition in a PAM policy. The scenario is that a group of users has access to privileged resources, but at the time of access there needs to be just-in-time (JIT) approval by a manger, service owner or some other person/team.

    Overview

    OPA provides all of the components to support this use case. It involves the OPA client working with the OPA cloud service and triggering an access request flow in Access Requests. The flow is shown in the following figure.

    The steps are:

    1. The user requests access to a resource via the client (“sft”), such as trying to SSH to a Linux server. The client calls the OPA cloud service to evaluate policy.
    2. The response includes the access methods (principal accounts and/or a list of vaulted accounts) and any conditions. In this case the condition is an access request.
    3. The user selects one of the access methods and the client responds to the cloud service to raise the request. The client gets details of the request when it’s been raised (4), returns this to the user session and closes the request.
    4. The cloud service raises a request in Access Requests.
    5. The request runs and seeks approval and responds back to the cloud service with an approve or deny. This result is stored in the cloud service.
    6. The user again requests access to the resource and the client calls the cloud service to evaluate policy.
    7. The response again shows the access methods, but now shows the previous access method as approved. The user can now select that access method and connect to the resource.

    Note that the same flow is used for accessing resources via the OPA web user interface. Also, there will be the normal OPA authentication/authorization steps that we won’t cover here.

    Lets walk through an example to show how this works.

    User and Reviewer Experience

    We start with the user, who uses the client to get a list of servers they can access.

    They run a client command to ssh to the opa-demo-linux server. The client contacts the OPA cloud service to evaluate the policy for this user against this server.

    The policy determines that the user can access the server with one of two vaulted accounts – pamadmin1 and pamadmin2. Both require approval.

    The user selects 1. to connect using the pamadmin1 account. The client contacts the OPA cloud service to initiate the request, responds to the user with the request Id and closes the request.

    With the request is raised in Access Requests, the reviewer will get notification via email to go and review the request. They access the inbox in the Access Requests interface to see the new request.

    They open the request and can see details of the user, the access type, the account they want to use and the server they want to connect to.

    The reviewer can approve or deny the request. In this case they approve it.

    The user then retries their server access.

    When the policy evaluation is returned, the Approval condition for pamadmin1 is showing as met. They select this access method.

    They are connected to the server with the pamadmin1 account.

    Now lets look at how this was put together.

    Configuration of the Components

    Assuming that the Access Requests platform is set up for Privileged Access, we need a Request Type (request flow) in Access Requests for this server access scenario. The following show a simple flow to implement this (if you are not familiar with Request Types in Access Requests, we suggest exploring the articles on the OIG Access Requests page).

    This request type has three steps:

    1. Get approval from the ‘server manager’. This could be a user manager, service owner, a team of approvers etc. There could also be multiple approval steps.
    2. If the access is approved run an action to tell the OPA cloud service that the request is approved
    3. If the access is denied, run an action to tell the OPA cloud service that the request is denied

    The approval step is standard for Okta Access Requests. The actions in the other two steps are new and unique to OPA.

    Note that these actions are tied to a Access Requests team called Privileged Access that is provided by the limited use OPA Access Requests license. They cannot be run by any other teams in Access Requests. If you have both OIG and OPA, you will see two default teams - IT and Privileged Access. You can create other teams, but these two actions are associated with the Okta Privileged Access connection and only the Privileged Access team can be assigned to it.

    Now that we have an Request Type, we can assign it to policy in OPA.

    Approval requests is a condition on policies. It has two settings – the Request Type to call, and the approval duration (time for the approval to remain valid in OPA).

    And that’s it, fairly straightforward – create and publish a request type and assign it to the relevant policy in OPA.

    This concludes the discussion of the Access Requests and a PAM Policy Condition use case.

    Access Requests to Manage Groups Used in OPA

    This is the more traditional Access Requests scenario seen with Okta Identity Governance. Okta Privileged Access (OPA) uses groups pushed from Okta to drive both the administrative roles and policy membership. These can be exposed through Access Requests.

    Groups in Okta and OPA

    Let’s look at the groups we have assigned to the OPA Team.

    There are multiple groups assigned to team roles, but also two groups used in policy: PAM Linux Sysadmins and PAM Windows Sysadmins.

    These groups are pushed from Okta groups in Okta.

    As these groups are in Okta, we can manage membership via Access Requests. We’ll walk through this…

    Creating a Request Type

    We have created a Request Type (request flow) in Access Requests for users to select a time-bound access to either the Linux or Windows group.

    When run, it will ask the user for a business justification, select either Windows or Linux, and when they need the access until (a date).

    The flow will run with a single approver and when approved will add the user to the relevant group in Okta (which will immediately be pushed down to OPA). It will then start a timer to expire on the date selected and on that date it will automatically remove the user from the group.

    Requesting Access

    When a user runs the request through the Access Requests portal (or via Slack/Teams if that integration is enabled) they are presented with a dialog to enter the required information.

    When they submit the request and it is approved, they are added to the the appropriate Okta group and that group change is pushed to OPA. The activity view of the request in Access Requests shows the user added to the Okta group and the timer (for removal) started.

    The Okta system log (filtered for that group) shows the user added to the group and the updated group pushed to OPA.

    And we can see the user assigned the OPA group in OPA.

    They would now be subject to the policies that the PAM Windows Sysadmin group is assigned to.

    This is leveraging standard Okta and OIG capabilities – groups assigned to an application (in this case OPA) as push groups, and group memberships managed through Access Requests. Note that this capability (unlke the earlier one) requires an Okta Identity Governance license.

    Conclusion

    This is a very effective way to manage access to privileged resources. You could have standing privileges (if your risk posture was ok with that) through default Okta groups (perhaps leveraging group rules tied to profile attributes from HR) and requestable/fixed-time additional access managed through Access Requests.

    This could be combined with the earlier use case of JIT approval from the client to map access against different levels of privileged access – for example low-risk access by standing access, medium-risk by requestable/fixed-time access, and high-risk a combination of requestable/fixed-time and JIT approval (and other controls). The different integration use cases allow for this flexibility.

  • Okta Privileged Access – A Look at the Data Model

    This article provides a simplified view of the data model used in Okta Privileged Access (OPA).

    Note that this is a logical view of data objects and their relationships, and the term “object” is used very loosely (more like data types). Also this is based on the current Early Access product and may change with GA and into the future (including the Kubernetes Beta showing in the screenshots that doesn’t currently fit into the access model).

    This article was originally written against the Limited Early Access release, but has been updated for the Generally Available (GA) release in Dec 2023.

    An Overview

    If you are familiar with Okta Advanced Server Access (ASA), OPA represents a similar but more sophisticated model to support an administrative RBAC model and scalability for more privileged resource types.

    The layout of the OPA user interface gives an indication of the data managed.

    It is broken into three broad categories as shown in the menu layout:

    1. DIRECTORY – Users, Groups and Clients
    2. RESOURCE ADMINISTRATION – Resource Management, Gateways and System Configuration
    3. SECURITY ADMINISTRATION – Policies and Labels

    It is important to note the separation of resource administration from security administration.

    These objects and their relationships are shown below.

    We will explore these objects and their relationships in the following sections.

    Directory Objects

    There are three directory objects that appear under the Directory section of the menu – Clients, Users and Groups (as shown. in the earlier screen shot).

    Clients represent the enrolled client software (“sft”) running on user workstations and tied to specific users. When the client is installed and a user enrols in that client, an entry is added to the clients list.

    Registered Users are provisioned from Okta when they are assigned to the Okta OPA app. For a user to be able to access the OPA UI or run the command line tool (sft client), they must be defined as a user in OPA (which maps back to an Okta user). There are also Service Users for programmatic access to OPA via APIs.

    Groups are generally Okta Groups pushed from Okta, but can also be created locally in OPA (there are two default local groups – everyone and owners from the ASA heritage). Groups have two key uses:

    • Assignment to policy (to access a resource you must be in a group assigned to a policy that gives access to that resource). This is labeled as Principal in the figure above.
    • Assignment to administrative roles. Groups of users who can manage resources or policies. These might be the Common Roles, or Delegated Roles (assigned as Owners for Resource Groups).

    There are also Roles in OPA. Groups may be assigned to one or more of the following Roles:

    • PAM Administrator – this role can assign groups to other roles but not perform any resource or policy administration
    • Resource Administrator – users in this role can administer ANY resource objects in this OPA Team
    • Delegated Resource Administrator – users in this role can administer only those resource objects in the Resource Group their group is assigned as an Owner to.
    • Security Administrator – users in this role can administer ANY security policy objects in this OPA Team
    • Delegated Security Administrator – scoped to specific policies (introduced with secrets)

    These roles are used to control who can manage resources and policies and any scope of that management.

    Resource Administration Objects

    The next section is the Resource Administration section of the menu.

    Resources are the privileged “things” that OPA is controlling access to, like servers or shared credentials (secrets). Resource Administration is concerned with managing the resources, Gateways and System Configuration.

    A Resource Group is a container for sets of resources and is used to group resources from an administrative scope perspective. For example, the ‘Linux Server’ resource group is administered by the Linux sysadmin team, whereas the ‘Critical App Secret’ resource group is administered by the Security team. It has a Name and Description. It can have Owners – groups of delegated administrators who can manage objects in that resource group. It also has one or more Projects.

    Within Resource Groups are Projects. Projects are containers for related resources, such as servers or secrets. The contents of each project will depend on the resources stored in it. For example, for servers there are the server definitions themselves, the local accounts discovered on the servers (and which ones are managed in the vault) and a set of server settings such as enrolment tokens, discovery and password settings, gateway selection and account lifecycle (JIT or persistent). For secrets it’s the secrets and the secret folder structure.

    Gateways are used for network proxying and other functions like SSH/RDP session recording. Gateways are set up with labels and these are used to map gateways to sets of servers in Projects.

    There is also some Team-wide System Settings such as session durations and user/group attributes. The new Cloud Infrastructure Entitlement Management (CiEM) has two menu items, Cloud Connections and Entitlement Analyses, that are not shown in the screen shots in this article.

    Security Administration Objects

    The last section is the Security Administration section.

    Labels (not shown in the data model diagram) are defined when some resources are enrolled. For example server resources have hostnames, OS types etc. Labels can be used when assigning resources to policies. You cannot change the labels – they are defined my the mechanism to import the resources. This is a security control to separate resource management from policy management – if labels are used to control policy, you can’t have resource administrators being able to change labels.

    Policies define who can access what and how. A Policy has a Name and Description. Principals are who the policy applies to, by group. A Policy will have one or more Rules.

    The contents of a rule will depend on the resource type it applies to. For secrets it defines the granular access on folders and secrets and any conditions (like requiring an access request approval). For servers it defines the access type (SSH/RDP), the resources (e.g. servers), access methods (i.e. with principal account and/or vaulted shared account) and any conditions (such as access request, per-resource MFA, via a gateway and with session recording).

    Ideally resources would be assigned to policies via labels, but there may be situations where there is a direct assignment.

    Multiple policies may apply to users and OPA will merge policies for a user when they try to access a resource. Policies can also be in a Draft (un-published) or Active (published) state. Only active policies will be used when determining if and how a user can access a resource.

    Summary

    In summary the following figure shows the objects and their relationships.

    The key points are:

    • Users and Groups are provisioned/pushed from Okta (although local groups can be defined)

    • Groups are used to assign users to
      • team-wide roles (PAM Administrator, Resource Administrator, Security Administrator),
      • delegated roles (administrators for specific Resource Groups) and
      • policies (Principals, i.e. who can access a privileged resource)

    • Resource administration is separated from Security Policy administration with separate administrative roles (separation of duties for administrators)

    • A Resource Group contains Projects with resources and resource type-specific settings

    • A Policy contains Rules that define who can access resources and how.

    This concludes the exploration of the Okta Privileged Access data model.

  • Okta Privileged Access – A Technical Introduction

    The new Okta Privileged Access product was featured in the recent Oktane23 conference. The product became Generally Available on Dec 1 2023.

    This article is a brief technical overview of Okta Privileged Access (OPA) looking at the components, functions and managed resource types of the product. It is written to provide a backdrop for other material looking at the capabilities of the product and to help architects understand where the pieces fit in the Okta landscape.

    This article was originally written against the Limited Early Access release, but has been updated in Jun 2025.

    Components of Okta Privileged Access

    The following figure provides an overview of the OPA components.

    The product comprises a set of (optional) infrastructure components and multiple cloud tenants. Let’s start at the bottom and work our way up the figure.

    To support infrastructure privileged access (server and, soon, Kubernetes clusters) there are some installable components that are used – a Client that resides on the users workstation, an Agent that resides on the servers, and optionally a Gateway for network proxying. If you are familiar with Okta Advanced Server Access, these components are the same (more details can be found here). Note that Bastions are no longer used. There is an OPA Technical Guide for the Infrastructure Components available on the OPA Product Hub.

    The next layer in the figure is the Okta Privileged Access tenant, called a “Team”. This is the cloud service for managing privileged access. It has it’s own datastore and also a Vault for storing credentials.

    The next layer in the figure is the Okta platform, the Okta Workforce Identity (OWI). The Okta Privileged Access app (team) is represented as an application in Okta like any other SaaS application – it has SSO & provisioning, assigned users, push groups, authentication policies, and is in the OIN catalog. OPA will also leverage Universal Directory indirectly – through users and groups associated with the application. It will also leverage the System Log (more on this in the next section).

    Sitting above WIC in the diagram are two components – Okta Access Requests and Okta Workflows. Okta Access Request is included in the OPA product in a limited form for a specific use case (see below), and extends access requests to other platforms like Slack/Teams and email. Okta Workflows is not part of the OPA product but may be useful for bespoke automation tasks (see some examples here). There is a Workflows connector for Okta Privileged Access.

    All of these cloud components are sitting behind the Okta Dashboard.

    Now lets dive into the functions provided by these components.

    Functions of Okta Privileged Access

    The following figure provides an overview of the OPA functions in the context of the components.

    Again, let’s start at the bottom and work our way up the diagram looking at the functions (green boxes).

    At the infrastructure layer the Gateway, in addition to providing the network proxying capability, can perform Session Recording of the SSH/RDP sessions flowing through it.

    The Okta Privileged Access Team implements the PAM administration. This includes managing:

    • PAM Users, Groups and Admin Roles – other then some baked-in local groups, all users and groups are pushed from Okta. The admin roles can be assigned to groups.
    • Policy, Rules and Controls/Conditions – policies define who can access resources and rules within policies define how which includes any controls or conditions (MFA, Access Request, Session Recording)
    • Resources, Connections and Mapping – resources are managed separately from policies. There are containers (resource groups) that can be assigned to administrators (delegated admin model) and projects with like resources grouped together. For some resource types, there are also connections to be managed and account mapping rules.

    More information on the data objects and their administration can be found in OPA – A Look at the Data Model.

    There is an API available for OPA.

    Finally, the Vault enables the storage and control of access to Secrets, Managed Accounts and other resources.

    The Okta Workforce Identity platform also provides functionality leveraged by OPA in addition to hosting the OPA application. OPA is writing Privileged Events into the System Log and can be subject to custom reporting. It is pushing users and groups to OPA application. The Okta integrations for AD (via the Directory Integration and AD Agent) and SaaS apps (via OIN apps) used for those resource types.

    There are two main integrations between Okta and OPA:

    1. OPA is an application in Okta like any other. It is leveraging OIDC for SSO and SCIM for LCM.
    2. To support more recent resource types (Okta/SaaS Service Accounts, AD Accounts) a synchronisation mechanism has been built between the apps. This is used for discovery/import and password synchronisation (on rotation).

    One of the policy controls implemented in OPA is the ability to run an access request when trying to access a resource. OPA includes a limited version of the Okta Access Requests component to implement Privileged Access Requests. OPA will call into Access Requests to raise a request which would then be reviewed/approved (say by a manager or service owner) and returns the result for OPA to allow or deny access to the resource. Whilst not part of the OPA product, Okta Access Requests (with an Okta Identity Governance license) could also be used to manage the groups memberships driving PAM roles and PAM policy assignment in OPA.

    Okta Privileged Access Resource Types

    When OPA was first released it only supported local servers and generic secrets. The following figure shows the complete list of resource types supported.

    The current list is:

    • Linux Servers – connect via SSH using JIT individual accounts or shared accounts
    • Windows Servers – connect via RDP using JIT individual accounts or shared accounts
    • Active Directory (AD) accounts – discover/manage AD accounts and allow them to be revealed and used
    • Secrets – any credential stored in the vault and can be revealed and used
    • SaaS Service Accounts – account credentials stored in the vault and can be revealed and used. If the OIN integration is available, OPA can manage the passwords for those accounts
    • Okta Service Accounts – where accounts in Okta are shared amongst users, those accounts can be stored in the vault with password rotation, and allow reveal and use.

    There are other PAM use cases that can be supported in the wider Okta Workforce platform, including:

    • SaaS federated accounts where entitlement can be assigned dynamically and controlled through governance functions like access requests / certification
    • Active Directory group membership managed in Okta, where those groups provide privileged access to domain-joined resources and can be controlled through governance functions like access requests / certification

    This is a brief high-level view. Okta Privileged Access continues to mature and extend it’s scope.

  • Entitlements Managed in OIG with Early Access

    The new Entitlement Management capability in Okta Identity Governance (OIG) is currently in Early Access for OIG customers.

    With this release Okta has updated five of the Okta Integration Network (OIN) connectors to support this new capability – splitting entitlements from other application profile attributes and managing the two-way sync between Okta and the applications.

    The following table lists the application entitlements managed in OIG.

    SaaS Application Entitlements
    salesforce.com Feature Licenses
    Permission Sets
    Profiles
    Public Groups
    Roles
    Google Workspace Licenses
    Roles
    Oracle NetSuite Roles
    box Roles
    Microsoft Office365 Licenses
    Roles

    This is just the current list of updated OIN connectors. This list will grow.

    Also, for apps that don’t have an OIN connector or just need to be managed by OIG (i.e. no need for SSO) you can implement a BYO Entitlements model using the OIG APIs (perhaps in Workflows).

  • OIG Entitlement Management – A Technical Introduction

    Okta continues to enhance the Okta Identity Governance product in the areas of Access Requests, Access Certification, and Governance reporting. However a significant update, Entitlement Management, was announced at Oktane23 and is currently in Early Access. This article provides a technical overview of the new Entitlement Management capability.

    What is Entitlement Management?

    Okta is adding Entitlement Management to Okta Identity Governance (OIG). But what are “entitlements” and what is “entitlement management”?

    Entitlements are anything in a system, application, database, platform etc. that grant users access (sometimes called fine-grained entitlements). Entitlements are often a connection between users/accounts and the permissions needed to perform a function. Think of Salesforce.com with its Roles or Amazon Web Services (AWS) with Permission Sets. The entitlement models vary widely and can become very complex (for some light reading, have a look at some articles I wrote looking at entitlements in RedHat Linux, IBM zOS RACF, and trying to apply a common governance data model to various systems).

    Entitlements may be attributes associated with an account/user, may be based on membership of some grouping (like a Role, such as in a RBAC model) or even dynamically assigned (such as in an ABAC model).

    Entitlements Management can cover the entire spectrum from managing user assignments to entitlements, through managing entitlement relationships, to managing entitlement mapping to permissions on resources.

    Most identity management (IdM) products can manage the user to entitlement mapping. However when it comes to managing entitlement relationships or entitlement to permission mapping, not many IdM products will implement this. It may be hard to drag a security administrator away from the tools/UI they are comfortable using, and it often involves building system-specific logic into the IdM product and maintaining it; It would be a significant piece of work to implement logic to replicate the AWS or Salesforce.com entitlement management into an IdM tool.

    Note that to use Entitlements Management described here, you need to have the Okta Identity Governance (OIG) product, not just Lifecycle Management (LCM).

    Doesn’t Okta Already Do Entitlement Management?

    Okta currently implements some entitlement management into the Lifecycle Management product. Application user profiles contain entitlement attributes that integrations can sync. 

    These entitlement attributes can be applied at the group level, so assigning a user to a group means the user is granted both the application and any entitlements tied to that group.

    Whilst this mechanism works, it can lead to a proliferation of Okta Groups. Also, these fine-grained entitlements aren’t exposed to OIG functions like Access Requests and Access Certification, nor can we report on fine-grained entitlements granted through groups. 

    This is where the new OIG Entitlement Management capability comes into play – promoting entitlements to first-class objects in Okta so they can be requested in Access Requests, reviewed in Access Certification and reported in the Reports function of Okta.

    A Technical Overview of OIG Entitlement Management

    OIG Entitlement Management is a new capability that has been added to Okta Identity Governance. It makes entitlements first-class objects. It supports both automatic policy-based assignment and request-based assignment of entitlements.

    In short Entitlement Management can be thought of as three components for now; the Governance Engine and the entitlements data it manages, extensions to the Access Requests function to support requesting entitlements, and extensions to the Access Certification function to support reviewing entitlements. Reporting will come later.

    The following diagram shows the major components and data objects:

    The main component of OIG Cloud Entitlement Management is the new Governance Engine. When an Okta Application has the Governance Engine enabled, a new Resource is created in the Governance Engine to represent that application. 

    The central object is the Entitlement. Entitlements represent entitlements on connected systems (like a role, profile or license). A resource can have multiple entitlements and each entitlement can have a set of values. Entitlements can be single-valued or multi-valued.

    Entitlements can be automatically assigned to users via an Entitlement Policy. This attribute-based automatic assignment approach is analogous to Group Rules for assigning users to Groups based on some attribute. There will be one policy for a resource, but it may have multiple Rules that are applied based on priority to determine what entitlements can be granted to a user.

    Entitlements can also be collected into Entitlement Bundles. Bundles represent logical groupings of entitlements and one bundle may contain multiple entitlements and multiple values for each (for multi-valued entitlements). A bundle might represent a jobrole where all entitlements for a specific job in a single application are bundled together. Or maybe a set of accesses one might request, such as an employee visiting head office needs both building and carpark access, and a bundle could be created to put them in a single access request. 

    Grants represent the association of a user with an entitlement or an entitlement bundle. With Entitlement Management, the application user profile is no longer used to store entitlements (as was done in Lifecycle Management).

    With Entitlement Management, entitlement bundles are exposed to the Access Requests Platform and are resources that can be requested in a Request Type in the same way that groups and applications can. A list of bundles is synchronized to Access Requests into an Entitlement Bundle list that can be used in Request Types to request access. There is a new Okta action to assign a user to an entitlement bundle.

    All entitlement grants can be reviewed in an Access Certification Campaign for the Application resource type. If a user has both entitlement and bundle grants, it can show both and may allow automatic revocation where that doesn’t conflict with policy.

    Entitlement Management supports both a BYOE (Bring Your Own Entitlements) model and integration with SaaS applications. For BYOE, entitlements and values can be managed via either the user interface or APIs (perhaps via Okta Workflows). For application integration existing Okta Integration Network (OIN) connectors have been modified to support the entitlements that the applications support. They can consume the entitlements and existing user-entitlement mapping, and also provision changes to user-entitlement mapping. As of today there are five connectors enabled for this – salesforce.com, Google Workspace, Oracle Netsuite, Box and Microsoft Office365. This list will grow over time.

    Splitting the Entitlements Out from the Application Profiles

    A key aspect of the new capability is that the entitlement attributes have been split out from the application (user) profiles.

    This is shown in the figure below – the left is an existing salesforce.com application user profile, the right is the new split with the reduced application user profile and the separate entitlements for the user.

    You can still use the existing tools to manage the remaining application profile attributes – groups assignments for shared attributes (like departmental common attributes) and attribute mapping from the Okta profile.

    But there is no longer a need to use groups to assign entitlements to a user – the Entitlement Policies and Entitlements Bundles will do this. This is significant and should make a lot of Okta deployments simpler.

    Where To From Here?

    This is the first of a series of articles that will look at the new Entitlement Management capability of OIG. If you are an existing OIG customer and want to see more, reach out to your Okta account team.

  • OIG Assets in the Okta Community

    Those following this blog will know I post a lot of technical assets on the Okta products from a technical specialist perspective, such as the how-to’s that aren’t obvious from product documentation or cross-product solutions to address specific use cases.

    But did you know there are some community assets published by Okta in addition to published documentation? I thought it worthwhile to highlight a few as they often contain updates from Product Management and other official sources.

    The Okta Community is a collection of assets provided by Okta to help customers and partners in the use of Okta’s products.

    There are product hubs, such as for Okta Identity Governance, Workflows and Advanced Server Access. The OIG product hub is the go-to place for all OIG-related content. It includes:

    • Overview and FAQ pages
    • A Getting Started Guide written as a lab guide to get you familiar with the basic concepts and components of OIG
    • Release Notes, which are very useful as new features are being introduced regularly
    • Recent and popular knowledge articles, including some copies of articles on davidedwardsphotos.com/iamdavid/.
    • Common and recently answered questions

    The Questions Forum is the place to go to see and post questions. This may be a valuable alternative to logging a support ticket. You can filter by specific products.

    You can also view the Blogs and search for OIG posts. Some interesting recent blogs include:

    There are Discussion Groups, including a new Okta Identity Governance (OIG) discussion group.

    We encourage all OIG users to register for the community, look at the product pages (such as OIG, Workflows, LCM, UD), leverage the assets already there and make use of the new discussion group.

  • OIG Access Requests – Can I Attach a File?

    A common requirement for access requests is adding a file to support the request. It may not be obvious, but Okta Identity Governance has the means to attach a file to a request.

    Let’s explore this and show an example.

    How to Attach a File in the Access Requests Portal

    A file can be attached to a request from within the Access Request portal. At the bottom of the body of the message there’s a field for entering text, and on the left of that is a paperclip icon for attaching a file.

    This will prompt for an upload.

    Once the file is found and selected, it is attached and any comments can be added.

    The comment and file now appear in the request messages.

    How to Attach a File In Slack

    The Slack integration can also be used. The chat mechanism can be used to attach a file as you would for any chat by replying to the thread for a request.

    This will be attached to the request messages.

    An End-to-End Example

    The following is an example of file attachment in use. To make it more intuitive, I have added a message to the request messages to prompt the user to attach the document (and remind the reviewer that there must be an attachment). This is using Okta Workflows based on the mechanism described in OIG Access Requests – Posting Additional Information into a Request.

    The flow starts with a user requesting access. This could be via the Access Requests portal or chat tool like Slack.

    After they submit, an Okta Workflow runs in the background to adds a prompt to the request messages.

    The user clicks on the paperclip icon and adds the file.

    And it is added to the request messages.

    The reviewer, such as manager, is notified of the new access request and that they need to review.

    In this case they go to Slack to review. They see the new request and click the n replies link to see the messages in the thread (right panel in Slack).

    The thread view on the right shows both the message we put in for them to check for the attached document and the message with the attached document from the requester. The manager can now review the access request and approve or deny the request.

    Note that is doesn’t matter whether the file is attached in the Access Requests Portal or attached to the chat thread, it will be visible in both interfaces.

    If they had used the Access Requests Portal, they would also see the message and attachment.

    This information, including the attached document, will be stored away with the request.

    Thus, attaching a document to an Access Request is a simple function that can be performed from within the Access Requests Portal or via the chat functions.

  • OIG Access Requests – Posting Questions Based on Earlier Selections

    My colleague, Rajesh Kumar, showed me something today that fell into the “wow, I didn’t even think of using the product this way” category. It involves using logic in Access Request flows (Request Types) in Okta Identity Governance to prompt for additional information based on earlier selections.

    Let’s look at how the user experiences it, then how it’s built. The scenario here is the the user is requesting some sort of office access. They must select the state, and then based on the state selected, they then get a list of state-based offices to select from. It’s a trivial example to show the mechanism.

    Overview

    The Okta Access Requests platform uses Request Types to build flows with steps. These steps may be questions for the requester (or someone else) to provide some information. They may also be approval steps, actions to be performed, tasks to be performed externally and timers to delay execution. All of these components are built into flows to represent the business processes for requesting access.

    Logic can be applied between steps, such as “only add this user to the group if the previous approval step completes with approval”. This logic can also be applied between questions, where the display of a question is conditional on the selection or value entered in a previous question. For example, if provisioning building access, you may prompt the requester to select the state first, then based on the state present a list of offices in that state. The office selection questions presented are conditional on the state selected.

    This article will show how this can be implemented in Request Types in Okta Access Requests, starting with the user experience and then how it’s built.

    User Experience in the Access Requests Portal

    When requesting access in the Access Requests Portal the experience is as follows. The user selects the request type from their App Catalog.

    As usual, they are presented with a set of questions, in this case a Justification and a drop down list to Select state.

    They select the state from the dropdown list.

    On selecting a state, the dialog is changed and a third question added (“Select Vic office“) because the user selected Vic as the state.

    Note that changing the Selected state will dynamically change the third field.

    The users selects from the pulldown list of Vic offices.

    And submits the new request.

    The standard Request display shows all three questions answered.

    The flow would then proceed as per the Request Type flow (e.g. manager approval then provisioning).

    User Experience in the Slack App

    The user experience when requesting access through the Slack app is basically the same. The user selects the resource (Request Type).

    A dialog displays the first two fields (business justification and state to pick).

    They fill out the fields.

    Unlike in the Access Requests Portal example above, the Slack app does not automatically refresh with the third field. The user clicks the Submit button to send the current set of information to the Access Requests platform. It will respond to the app and the app will refresh the dialog with the third field.

    The third value is selected.

    Once the submit button is clicked, the request is created. The user can see the request information in Slack (or in the Access Request Portal).

    As earlier, the request will continue with the next steps in the Request Type.

    Building the Request Type to Support This

    This Request Type flow is built using two standard features of Access Requests – Configuration Lists and Logic on steps.

    You don’t need to use Configuration Lists, but if you’re offering selections that will branch in subsequent steps, using Configuration Lists means you don’t have to worry about users mistyping the selection. For example, it’s easier to have “Vic” in a config list than allowing the user to type in the state and have to allow for “vic”, “victoria”, “Vic”, “Victoria”, etc.

    However you do need to use Logic to decide which step (Question) to present to the user next.

    Let’s have a look at how this flow is built. There are two initial questions – Justification and Select state. The state selection is a Dropdown tied to a Configuration List called Office States (that has three values “Vic”, “NSW”, and “Qld”). Both are mandatory and you know one of “Vic”, “NSW” or “Qld” will be selected for the state.

    Next come the variable questions – one for each state option. The Vic one is highlighted below and has it’s own dropdown, Office – Vic that has a list of Victorian offices.

    It is assigned to the Requester (same as the earlier two questions).

    Note that this step has Logic to only show if “Select state is Vic” (and the following one has “Select state is NSW“).

    This is where the “Only show this field if” actually makes sense (in most other scenarios this option means “only run this step if”).

    Notice that the next step tied to this one (“Set Vic office”) has a condition of “Select Vic office is Filled“. This means it will only run if the Select Vic office step has run and a value is selected.

    This is important. You have effectively built a large switch statement and need to keep the subsequent logic within the respective case. Something like:

    select state
    if state = "Vic"
       select Vic office
       perform some action/tasks for Vic office selection
    if state = "NSW"
       select NSW office
       perform some action/tasks for NSW office selection
    ...

    If you get the Logic conditions wrong on subsequent steps, you may find steps executing when you don’t expect them to.

    Another thing to consider is that each question is setting a different field in the flow. This is the nature of the Access Requests platform. For example if the Select state is “Vic” then I’m setting the “Select Vic office” field, whereas if I select “NSW‘ in Select state, then I’m setting the “Select NSW office” field. This is different to normal programming practice where each branch would be setting the same field (e.g. State = Vic and StateOffice = “one of the Vic offices”, or State = “NSW” and StateOffice = “one of the NSW offices”). If you want to have a common step in the flow later, you may need to include conditions of all the fields or pass all the fields.

    For example if I wanted to call an Okta Workflow with the state and state office, I would need to pass all the possible fields (e.g. Select state AND Select Vic office AND Select NSW office etc.) and let the workflow determine the selected values. This is shown below:

    Event though only one state will be selected, so only one state-based office selected, all three state-based offices would be passed to the workflow which would decide which to process.

    This concludes the exploration of the feature. If you want more information on calling Okta Workflows from Access Requests, see this article – OIG Access Requests – Calling an Okta Workflow from within a Request Type.

    Conclusion

    This article has shown how Logic on Access Request questions can be used to prompt the user for different information based on earlier selections.

    This mechanism is more useful where you need variability in the user interactions. If you want complex logic in the flow (that doesn’t require user interaction) you might be better off calling out to a Workflow to perform the subsequent steps.

  • OIG Access Requests and Workflows – Checking SoD In An Access Request

    OIG Access Requests and Workflows – Checking SoD In An Access Request

    This article looks at a new approach you could use to perform Separation of Duties (SoD) checking from Okta Access Requests using Okta Workflows. It shows two approaches you could take to get SoD analysis into the request a soon as it’s raised so that the reviewer has the information at hand before approving the request.

    Note that this integration leverages the Okta Identity Governance API that is still in beta but available to all OIG customers. This approach has been subsequently replaced by OOTB SoD functionality in OIG. Consider this article as another example of extending Okta with Workflows.

    Introduction

    Some time ago I wrote an article here on running SoD on group assignment. It was built around the concept of Okta groups representing Roles and Separation of Duties (SoD) rules based on toxic combinations of groups. The limitation of this approach was that it was after the point of group assignment and thus after the reviewer had approved the request.

    Two recent additions to Okta Access Requests, the ability to call Delegated Workflows from within a Request Type and the ability to update an open Request via API, has meant that SoD checking can be done as a Request is raised and before the reviewer reviews, meaning that can head-off any SoD conflicts. As this information is in the request body, it is also stored away and can be reported on later.

    This article presents two approaches for performing a SoD check and returning the results to the request body:

    1. When a new request is raised, an event is written to the Okta system log with details of the request. A workflow is listening for that event, performs the SoD checking, then returns the results to the request via the requests API.
    2. Within the request type, the first action is to call a workflow (before the first approver step). This workflow is similar to the first – it will perform the SoD check then return the results to the request via the requests API.

    Overview of the Two Approaches

    Both approaches use the same mechanism to perform the SoD check, but are triggered in different ways and are passed different sets of data so need to do some different initial processing before calling the shared code.

    Performing SoD Check Based on System Log Event

    This approach relies on the new request creating an event in the Okta System Log (access.request.created) to trigger the workflow (see OIG Access Requests – Posting Additional Information into a Request). This article also includes details of the new API call.

    The technical details are further down in this article, but the workflow will:

    1. Extract the details of the event and check to see if it’s one of the ones we want to do a SoD check on
    2. Call a subflow to determine what this access request is granting (based on a static table), i.e. which groups and/or applications will be granted with the request
    3. Call a subflow (Map) to check the SoD policy by looking for SoD rules (static table) that contain the entitlement(s) being requested, then getting all entitlements for that user to see if any of them (plus the new one) trigger a SoD violation
    4. For any violations found, a message body is built (there could be multiple violations)
    5. Then the workflow sets up for the API call and writes that violation back into the request

    This approach is built around the assumption that a Request Type will add a user to one or more groups/applications. As there’s currently no programmatic way to extract the relationship between a Request Type and the assignments it performs, a static table is maintained tying them together. This is not the ideal approach, but we’re limited by the OIG API at this stage. This approach will be most effective for simple Request Types that are granting a entitlements with no variable logic (e.g user will always get X, instead if determining what user gets based on selection or logic).

    Once a request is created (via the webUI, Slack or Teams integration, or even via APIs) it will write the event to the Okta System Log and trigger the workflow. This is an asynchronous process, but should be quick enough to post the SoD information into the message before the reviewer goes to review the request.

    The reviewer has enough information to help them make the decision to approve or deny the request.

    Performing SoD Check When Called from Within a Request

    In this approach, the Workflow to trigger the SoD check is called from within the Request Type itself using the new Workflow action (see OIG Access Requests – Calling an Okta Workflow from within a Request Type).

    The method of calling means that the workflow has access to different data to what is passed in the System Log Event in the previous approach. In this case you can only pass data that is being used in the request, like the requesters email, the request type name and the access being requested.

    The called workflow will:

    1. Consume the data sent over from the request
    2. Set up data for the SoD check: find out if the entitlement is a group or application and setup the name; find the userid from their email and find the requestId for this request
    3. Call a subflow (Map) to check the SoD policy by looking for SoD rules (static table) that contain the entitlement(s) being requested, then getting all entitlements for that user to see if any of them (plus the new one) trigger a SoD violation
    4. For any violations found, a message body is built (there could be multiple violations)
    5. Then the workflow sets up for the API call and writes that violation back into the request

    The last three steps are the same as in the earlier approach – a common subflow is being called with the userId and newEntitlement.

    It should be noted that currently there is no way to pass the requestId to the workflow (the earlier approach has it in the Event details). So I had to build a workaround that will get all open requests in the last x minutes, find all that match this user and request name, then select the newest.

    This approach is better suited to specific Request Types where the requester is selecting which access they want and this can be passed to the Workflow.

    As shown in the diagram above, once the questions have been answered in the Request Type, the Workflow action is called to run the SoD check. This action will write a message to the request saying the workflow has been initiated, then when the workflow runs the request will be updated with any SoD violations.

    The reviewer has enough information to help them make the decision to approve or deny the request.

    Technical Details

    Let’s look at some of the technical details of the integration. You should refer to the other two blog articles linked above for details of the two new functions used here.

    Note that there are common tables and flows used across this set (such as storing keys in a environment variables table and flows to access and use them) but they are not detailed here.

    Common SoD Check Workflows

    Both approaches use a common set of subflows to perform the SoD check and return any violation information to the calling flows. It consists of some Workflows tables and a series of flows.

    Workflows Tables

    There is a table for the SoD Policies.

    The table has a row for each SoD Rule. The columns are:

    • id – a unique id for the rule (not currently used)
    • name – a name for the rule, which appears in the output for any violation
    • description – a description for the rule, which appears in the output for any violation
    • scope – maximum number of entitlements a user can have before a violation is flagged (e.g. if it’s “1” you can have one of the entitlements, but once you add a second it flags a violation)
    • entitlements – a comma-separated list of entitlements (groups and/or applications). They are of the format prefix:name (e.g. A:O365 Guest is the “O365 Guest” application).
    • severity – the severity of any violation, which appears in the output for any violation

    This table is manually maintained.

    SoD Check Workflows

    There is a main subflow and a series of helper flows called to implement the SoD check. It will:

    1. Get the relevant SoD policies for this new entitlement
    2. Get the users current entitlements,
    3. Check to see if any of the matching SoD policies are violated based on what the user already has, and
    4. For any violated SoD policies, format the output and return it as text to the calling flow

    This flow is called by a Last Map card so will take each list item (i.e. new entitlement being added) and return a violation message (or blank if there is none).

    Let’s look at the flow in more detail.

    • It is passed the Okta userId and newEntitlement (in Prefix:Name format as per the table above)
    • It calls a helper flow (S10) to find all SoD rules that contain the new entitlement. The helper flow reads the SoD Policy table and returns a list of rules (as objects). This reduces later work – if a rule doesn’t contain the new entitlement being added, there is no point in further checks against it.
    • It calls a helper flow (S20) to find all the current entitlements for the user. The helper flow uses two Okta cards – one to get all groups for the user and one to get all applications for the user. It returns three lists: a consolidated list of entitlements in the Prefix:Name format as used in the SoD Policies table, a simple list of all group names and a simple list of application names. The latter two are used in formatting the output to go back to the response.
    • It calls a helper flow (S30) to check if each matching SoD rule is violated. It is passed the new entitlement, user entitlement list, and SoD rule object. It works out how many entitlements the user already has in the rule and whether adding the new one would be more than the scope (number allowed). It builds a new object with the SoD rule object but also a Violation flag (true/false). So the outcome of running this in a List Map card is that the list of matching SoD rules will be updated to indicate whether each has a violation or not.

    • The updated SoD rule list is filtered for only those flagged as violated (i.e. violation = true from the S30 helper flow)
    • This (hopefully) reduced list is processed in another List Map card using a helper flow (S40) that takes the SoD rule object and builds up a text representation to go back to the request. This text message includes newline and simple markdown characters.
    • As there may be multiple violations for this new entitlement, they are consolidated into a single bit of text (with newlines)
    • This consolidated text is returned to the calling flow

    Thus the set of flows are passed the user and new entitlement, find out the SoD rules with the new entitlement, determine what entitlements the user already has, then checks for violations with the current+new entitlements and for each violation found formats a text message to go back to the calling flow.

    Next we will look at the workflows that are calling this SoD Check subflow.

    Workflow Triggered by System Log Event

    The first implementation we will look at is where the SoD Check has been driven by the access.request.create event sent to the Okta System Log.

    Workflows Tables

    This solution requires an additional table that maps the Request Types to Entitlements.

    This table is manually maintained.

    Event-Driven Workflows

    The workflow (E00) is triggered by an access.request.created event in the Okta System log. At a high level the flow will:

    1. Extract the event data and check if this request is one we want to run a SoD check against (all new requests will create that event, but we might not want to run SoD checks against all of the them).
    2. Lookup the table above to find the entitlement(s) for this request
    3. Call the SoD Check subflow for the list of entitlements and get back any violation messages
    4. Use the new Requests API to add the message to the request

    Let explore in a bit more detail. The first card in the flow is the Okta Access Request Created event card. It contains all information about the event, but specific request details are inthe Debug Data object. The requesterID (userid of the Okta user requesting access), accessRequestId (request id) and accessRequestSubject (request type name) are pulled from the event.

    We have a hardcoded list of Request Types to run SoD checks on, so if the name isn’t in the list it’s not allowed in (“not in those shoes mate”).

    It calls a helper flow (E01) to get the entitlements from the table above for this Request Type (by name). A list of entitlements, formatted in the the Prefix:Name format, are returned.

    The Sod Check subflow described above is called for that set of entitlements passing in the entitlement and userid. This is run as a List Map card, so the result is a list of violation messages for each entitlement (the message will be blank if there are no violations).

    Finally the new API use used to write the message onto the request (see OIG Access Requests – Posting Additional Information into a Request).

    That completes the exploration of the flow for the first approach. The flow for the second approach is similar.

    Delegated Workflow Called from Within a Request Type

    The other workflow using the SoD Check subflows is the Delegated Workflow called from within the Request Type. It uses no additional tables.

    Delegated Workflow

    The Request Type is configured to call a specific workflow (D00). In short this flow will:

    1. Find the entitlement (group or application) and user passed in
    2. Find the request id
    3. Call the Sod Check subflow to get any violation messages
    4. Use the new API to write the message back into the request.

    The first part uses two helper flows (D01 and D02) to find and format the entitlement name and store it in a list (for the SoD check subflow) and get the userid for the user based on email.

    The next part finds the request id in a helper flow (D09).

    This helper flow (D09) is a workaroud as there’s no way to pass the request id from the Request Type to the Workflow. It will:

    • Build the API Authorization header and URL
    • Build a query to set the max requests to 200 and to filter Use the Requests API call to search for all requests lastUpdated lass than 30 minutes ago (see screen shot below)

    • Run the API call with query and strip out the list of results
    • For each found request, it checks (via helper flow) whether it contains the same userid and request name as the request that triggered this
    • For each match (and there could be multiple in the time window) is sorts them and takes the last (latest) one, returning it’s id

    Back to the main flow and it calls the SoD check subflow as described earlier, resulting in a list of violations formatted as messages. These are consolidated (which will be a list of one) into a text message.

    The last section is the standard set of cards to setup and call the API to write the message into the request. This is covered in detail in the other article.

    This concludes the technical exploration of the flows.

    Conclusion

    New capabilities within Okta Access Requests, to add messages to a request and to call a Delegated Workflow from within a Request Type, have opened up the ability to run Separation of Duties (SoD) checks after the user has submitted an access request and before the reviewer (such as their manager) has had a chance to review. This is much more timely than earlier examples that leveraged changes in group membership after a request has been approved.

    This article has shown two examples of integrations to run a SoD Check, either via the Access Request created event written to the System Log or called directly from a Request Type, that perform a SoD violation check and return any violations (with additional information) to the request, so the reviewer can review. It has explored the Workflows-based implementation of the examples so you could build them yourself.

  • OIG Access Requests – Posting Additional Information into a Request

    OIG Access Requests – Posting Additional Information into a Request

    This article looks at a recent addition to the Okta Identity Governance (OIG) Access Request API that allows updating of in-flight access requests and can be used to add additional data to help reviewers review requests.

    Note that the OIG APIs are still in beta but can be used against preview and production Okta orgs.

    Overview of the Integration

    This integration is based around a new OIG Requests API call (details below) that adds a new message to an existing Request in OIG Access Requests. This call could be made from any bit of code, Okta Workflows or any API execution environment (like Postman).

    For this scenario it made sense to use an Okta workflow triggered off the Access Request Created event in the System Log as the event is generated as soon as the request is raised (and likely before a reviewer goes into review the request) and the event contains the Request ID which is needed by the API call.

    The flow is shown below:

    The flow is:

    1. The user raises a request in Access Requests
    2. This generates the Access Request Created event in the Okta System Log
    3. A workflow is triggered based off that event that does some checking of the event, goes off to get the additional data (from the Okta User Profile in this case)
    4. It then formats that data into a message and uses the new API to update that Request with the message

    The next section will show the results of this and then we’ll dig into the mechanics of the integration.

    An Example Request With Additional Information

    Let’s start by looking at an example access request flow where addiitonal information is provided. A user raises an access request (in this case via the WebUI but it could be via Slack/Teams).

    As always they are taken to the request messages view. But notice that there’s an additional section showing additional information about the employee.

    Whilst this isn’t very useful to the requester, it is useful to the manager who needs to approve the request.

    This information has been gathered by an Okta Workflow and put into the request to help the manager make the decision on whether to approve the access request or not.

    This is a trivial example to show the mechanism, but you could do almost anything in Workflows such as checking whether this request breaks a Separation of Duties policy (and then letting the manager decide whether to allow the access or not).

    The Mechanics of the Integration

    In this section we will explore the building blocks of the integration shown above. The most important part is the new API call, but the others are included to show how you could build the integration yourself.

    New Requests API Call

    The new API Call is called Create a Message for a Request and it’s documented here: https://developer.okta.com/docs/api/iga/openapi/governance.requests.admin.v1/tag/Requests/#tag/Requests/operation/createRequestMessage.

    The POST URL requires a single argument, the {requestId}. It has the following format:

    /governance/api/v1/requests/{requestId}/messages

    The request body contains a single object with a message value:

    {
    "message": "Contact admin@atko.com for any additional assistance needed with this request."
    }

    The workflow below implements this based on the requestId being passed in the event.

    Access Request Created Event in Okta System Log

    For this integration we are triggering a workflow off the access.request.create event that is generated every time a new access is requested in Okta Access Requests. All events in the System Log have the same overall structure. The details needed are stored in the DebugData section of the event.

    The key fields we use in this integration are:

    • AccessRequestId – the id of the request instance that is used in the API URL
    • AccessRequestSubject – the name of the Request Type used
    • RequesterId – the Okta users ID (so we can do a user lookup)

    Depending on your scenario, some of the other fields may be of benefit. Note that you can’t add additional fields to this, the set of fields is fixed.

    Workflow to Get Additional Data

    A single workflow was built to implement the needed functionality. It had the following flow:

    1. Process the event – trigger off the event in the Okta system log, extract the relevant DebugDate fields and proceed if it’s one of the expected request types
    2. Go get the additional data – read the user in Okta to get the additional attributes and format into a message
    3. Setup and run the API – get the authorization header, build the URL, format the message into an object and call the API.

    Note that as the APIs are beta and not built into the Okta connector yet, the call uses the generic API card which requires the authorization header to be set up.

    The following sections show the flow in more detail.

    Part 1 – Process the Event

    The trigger for the flow is the Access Request Created event on the Okta connector. It will get all of the event details, including the Debug Data object (the card will strip this object out).

    It then strips out the three fields we need, and checks to see if the Request Type is one we want to process (and stops if not).

    Part 2 – Go Get the Additional Data

    Using the Okta User ID (the RequesterId from the event), an Okta Read User card is used to get some attributes from the user profile.

    These attributes are formatted into a message using a Text Compose card. Note that the carriage returns (“/n”) in the Compose card carry to the final message in Access Requests (see the results above are split across five lines).

    This is the flexible part of the flow. You could put any logic in here to go get additional data for the reviewer. For example, you could implement logic to get more details from the request and perform a SoD check.

    Part 3 – Setup and Run the API

    This part of the flow will:

    1. Build the Authorization header needed for the API call in a helper flow
    2. Get the Okta domain name from a workflow table via a helper flow (it could be coded into the flow)
    3. Construct the API URL with the Okta domain name and requestID passed from the event
    4. Build an object with the message body built above, and
    5. POST the API with the URL, authorization header and message body.

    This is a fairly standard approach to calling an API.

    That’s it, three main pieces in the integration (API, Event and Workflow) and no changes required in Access Requests.

    Conclusion

    This article has shown how the new Requests API call to put a message on a request can be used to provide additional information to the reviewer in the request messages. The example used here was to trigger a workflow off the Access Request Create event in the Okta System Log, collect some additional information about the requester from their Okta User Profile and put this back into the request. The example is almost trivial (it took me less than an hour to setup and test), but provides the basics to build more complex flow off of. This is a simple mechanism that could be used to great benefit.

  • User Access Reviews in Okta Identity Governance

    User Access Reviews in Okta Identity Governance

    This article explores the new user campaign (User Access Review) feature in Okta Identity Governance (OIG) Access Certifications.

    Introduction

    The ability to build and run access certification campaigns against resources in Okta (groups and applications) has been in Okta Identity Governance (OIG) since it was released. In June User Campaigns was added to address User Access Review requirements.

    Whereas the resource campaigns are focussed on who has access to a set of resources, the user campaign is focussed on what access (groups and/or resources) a user has. Resource campaigns are more useful to service owners or those concerned with compliance. User campaigns are more useful to managers who need to keep track of what access their people have.

    The mechanisms and interfaces for user campaigns are the same as for resource campaigns, so this is an evolution of OIG Access Certifications (as will be Entitlement Campaigns when the Entitlements features are rolled out). This means no new training for reviewers and the same management mechanisms used to today will also work for user campaigns.

    There is also a video walkthrough of this on the Okta YouTube channel – https://www.youtube.com/watch?v=dIu2FfKoDWo.

    In this article we will walk through creating and running a User Campaign

    Setting Up a User Campaign

    The set up steps are similar to a resource campaign, with the wizard-like UI walking though the general set up, user selection, resource selection, reviewer selection and remediation action steps. The following sections will highlight the differences (assuming you’re familiar with setting up Access Certification Campaigns).

    You begin by selecting User Campaign from the pulldown under the Create Campaign button (shown above).

    General Set Up

    The General page is the same as for every campaign – name and description, and execution start and duration.

    Users Selection

    The Users page is new for this campaign type. This is the page where you specify the users that will be the subject of this campaign.

    You can select to specify groups of users (all users in one or more groups), a specific user or use some Okta Expression Language (OEL) to determine the user(s).

    The second field will change depending on the selection of the first. For example, selecting Individual users will change the second field to Select users.

    If you select to use OEL you will get a text field for the expression language plus links to samples and the documentation (as you would with a resources campaign).

    This might be useful if you want to select a set of users based on a User Profile attribute, like review access to all users in a department or office location.

    Resources Step

    With the user(s) selected, you need to define what Resources to include. You can select all apps and groups, all apps or all groups.

    There are four checkboxes you can select or not:

    • Only include individually assigned apps – you can either see all apps for the user (i.e. assigned directly or via a group assignment) or only those assigned directly
    • Only include individually assigned groups – you can see all group memberships (i.e. manually assigned or assigned automatically through a group rule) or only those assigned manually
    • Exclude specific apps from the campaign – list those to exclude
    • Exclude specific groups from the campaign – list those to exclude

    By default you will see everything, but some campaigns may need selection of some of these options.

    Reviewer Step

    The Reviewer page is the same as for any other campaign. You can specify multiple levels of reviewer and also when notifications are sent.

    Some options, like Group Owner, aren’t available as they don’t apply to user campaigns.

    Remediation Step

    The Remediation page and options are the same as for any other campaign.

    Even though the campaign is presenting resource assignments by user, the outcome is the same – users retain or lose the assignment based on the reviewer selecting Approve or Revoke when reviewing, and these options control what occurs.

    Running a User Campaign

    Running the campaign is exactly the same as with a resource campaign – it is launched then reviewers review access until the campaign finishes.

    Launching the Campaign

    With the user campaign defined, it will launch on schedule or can be manually launched immediately.

    The administrator can see details of the campaign – a summary at the top and the review details (items) at the bottom.

    The reviewers will get notification of the campaign being launched.

    Campaign Review

    The reviewer, such as the user’s manager, will see the new campaign in their list of open campaigns

    Opening the campaign they will see the summary information and the list of items to be reviewed. This is the same as for any resource campaign.

    As with the resource campaigns the reviewer can see the details of a specific user-resource assignment by clicking on the row.

    The reviewer would run through all the assigned items and Approve, Revoke or Reassign as they would for a resource campaign.

    Monitoring, Managing and Reporting

    As with resource campaigns, the progress can be monitored in the Admin Console, review events will be sent to the Okta System Log (and can trigger automation in Workflows), and the campaign information will be available in the Access Certification Campaigns reports.

    Conclusion

    Adding user campaigns to Okta Identity Governance Access Requests for User Access Review requirements represents an evolution not revolution. The concepts and user interface are the same, just with a focus on users rather than resources. It represents a significant improvement in functionality with little incremental change to those using it.

  • OIG Access Requests – Calling an Okta Workflow from Within a Request Type

    OIG Access Requests – Calling an Okta Workflow from Within a Request Type

    For some time there has been the ability to trigger a workflow in Okta Workflows from a request flow in Okta Access Requests via events written to the Okta System Log. Events were created for a request being initiated and being closed. But this approach has some limitations, such as a lot of processing within the workflow to determine the request and what to do with it, and also you were limited to running a workflow at the start or end of a request process.

    A new more direct and more flexible mechanism has been introduced into the Okta Access Requests platform to allow a specific Okta Workflow to be called at any stage of a Request Type flow. This article explores the integration with an example request for Badge Access to a specific building being performed manually.

    Apologies for the length of this article – it has a lot of screenshots.

    Note that this integration is currently an early access (EA) feature in Okta preview environments.

    Overview of the Integration

    The following figure gives a high-level overview of the integration.

    The two main components, Okta Access Requests and Okta Workflows (Okta Workforce Identity Cloud, or just Okta, has a minor role to play). Workflows are built in Okta Workflows to implement some business function, such as a manual provisioning activity, sending an email or logging a ticket. These workflows are Delegated Flows (which is how they can be exposed to Access Requests).

    A list of available workflows is sync’d to Okta Access Requests in the same way that Okta users, groups and applications are (note the workflows list actually comes from Okta based on some security configuration).

    There is a new Action in Access Requests to call a specific Okta Workflow that can be added at any point in the Request Type flow.

    The Action will prompt for a set of fields to be populated from data within the Request Type flow. These fields are the same as those in the Delegate Flow card in the workflow. The values passed into these fields can either be:

    • One of the standard Request Type attributes of Requester email, Request subject or Request assignee’s email, or
    • Any of the fields tied to questions in the flow, such as business justification or end date

    There are some constraints:

    • The fields passed to the workflow can only be text, number, date-time or true/false. Objects cannot be passed
    • Only single values can be passed, so you cannot have say a dropdown in Access Requests with multiple selection and have those values passed as an array
    • There is currently no way to pass the request Id across to a workflow
    • You cannot return anything from the Workflow into the Request Type flow, this is a one-way execution and the Access Request flow will continue on as soon as it’s called the workflow.

    With the above in mind, lets look at how we configure the integration.

    Configuring the Integration

    There are four sets of activities that need to be configured for this integration:

    1. You need a workflow in Okta Workflows that can be called from the Access Requests flow. You could have multiple, but you need one as a minimum.
    2. To allow Access Requests to have visibility of the workflows, some role and resource definitions are required in Okta WIC.
    3. There is some Access Requests configuration required around teams and configuration lists, and
    4. You need an Access Requests flow to call the workflow

    These are detailed in the following sections.

    For this article we have a sample requirement to implement an access request flow for requesting access to a single building. There is no automatic way to do this, so an email must be sent to the team to perform the request manually and close out the request when finished. This team will be defined as a specific “Team” in Access Requests, so that the email is sent to the team member assigned in Access Requests.

    Build a Workflow in Okta Workflows

    The first thing we will do is to create a workflow. (Technically you could do it later, but why we do it first will make sense in the next step. It doesn’t have to be perfect yet, but we do need one there.)

    The most important thing is that this flow is a Delegated Flow, meaning it is initiated with a Delegated Flow card. This card contains the fields to be passed from the Access Request flow. For this example the flow will consume the requesters email, business justification, the building they requested access to, the assignee email (i.e. the badge access team member automatically assigned this request) and the end data for the extra building access.

    The flow steps are up to you, but for this example I have a flow that will lookup the user in Okta to get some name and email details, build up some text then send an email off to the assignee.

    Note that it doesn’t matter where in Okta Workflows this workflow is stored. The access to it will be controlled by security policy in Okta and that only relies on it being a Delegated Flow.

    Configure Roles and Resources in Okta

    We need to create a custom role and resource to allow Access Requests to see the available workflows.

    First, you need a new Okta Admin Role for Access Requests to access the delegated flows (like any other user/app who needs to run delegated flows in Okta Workflows). Go to the Roles tab in Administrators, and create a new role with the workflow permission of “Run delegated flow”.

    Next, go to Resources and create a new resource set, give it a name, and select the flow you want to allow access to (note that you can also expose all delegated flows which may be easier if you’re only using delegated flows for Access Requests).

    Go back to the new Role and edit the assignment to tie the Okta Access Requests OAuth application to the new resource set you created above.

    Once you save this, the Access Requests app will be able to see all Okta Workflows you specified in the resource set.

    Configure Okta Access Requests

    As this is a new integration into Access Requests, there are some initial configuration steps similar to setting up any integration in Access Requests.

    I created a new Team for the integration, so people in the badge access team could by dynamically assigned to requests and sent email.

    But you could use an existing Team.

    If you create a new team you will need to allow it to access Workflows under Settings > Resources.

    This new Team must also be able to access any other Resources or Configuration Lists you will use in any Request Type flows assigned to the Team.

    For example, if you build a configuration list for a pulldown list, the Team must be assigned to it, like my Buildings list below.

    The last thing to consider is the synchronisation of the Workflows list from Okta into Access Requests. This will occur normally on the 24-hour refresh cycle, but you can request an update immediately (it will run in the background).

    With this done, you can build a Request Type that calls a workflow.

    Build a Flow with a Workflow Action

    With the Okta Workflow(s) defined to Access Requests, including them in the flow is basically the same as for any other action.

    For this Request Type flow, I’m going to ask the user to supply a justification, select which building they need access to, and select an end date for the access to be removed. I’ll apply a single level of approval – their manager. Then I’ll pass the key information over to an Okta Workflow. The last step in the flow is a Custom Task for the assignee (i.e. the person in the team who will get the email) to come back to the request and close it after they have made the access change.

    The Manual Provisioning step is calling an Okta Workflow.

    When configuring the Action you select the workflow from the list of available workflows. This will populate the list of fields that the Workflow Delegated Flow card is expecting. In my case there are five fields:

    Field Sourced from
    requesterEmail The Requester email standard attribute in all flows
    buildingRequested Selected from a dropdown list in a Question, which is using a Configuration List
    businessJustification The first Question, a text field
    assigneeEmail The Request assignee’s email standard attribute (i.e. the email of the Team member assigned when the request is raised)
    endDate The last question, a date field

    Once Published, this Request Type and associated Workflow is ready to test.

    Testing the Integration

    To test this, we will initiate the request from a user, get their manager to approve, then check the execution of the workflow and finally close the request out as the assignee.

    Requesting Access

    The request for building access is initiated in the same way as every other request, in the Access Requests portal or one of the chat interfaces.

    The user completes the prompted fields.

    When submitted they see the request execution history.

    As usual, the manager would be notified by email, chat or if they are in the Access Requests portal, they will see it appear in their list of Requests. They would review and approve.

    Workflow Execution

    Once approved the action to call the Okta Workflow runs.

    The workflow runs, and in this case generates an email to the assignee (they would also get a generic notification from Access Requests to tell them they were assigned a request). You can see in the email body where attribute values from Access Requests have been substituted in.

    You could also check the Workflow execution history to see the data passed from Access Requests into the Workflow and how they were used.

    Completion

    The last step is for the assignee to go back into the request and complete it. As the badge access is an email-driven manual task, you would want to leave the request open until the manual work is done and so having a Custom Task at the end allows for that.

    This completes the end-to-end flow.

    Conclusion

    This article has shown how an Okta Workflow can be run from within an Okta Access Requests flow, adding to the earlier capability of using events in the Okta System Log. It has looked at the integration and what can, and cannot, be passed to a workflow.

    The bulk of the article has walked through the configuration and testing of an integrated pair of flows (one Access Request flow calling an Okta Workflow) using the example of a manual badge access request for a building, requiring approval before calling a workflow to send an email to the team managing badge access. This is a trivial example designed to show how the integration works.

    Hopefully this all makes sense and you’ll be able to use this article to get your integrations working.